Access
Click Alias Management > Manage Alias Relationship to manage relations between two database fields.
Table of Contents
Overview
The Alias Relationship functionality is designed to manage, create, update the dependencies between two database fields of the Relationship type. New dependencies are created by selecting the parent and child tables and specifying the parent and child fields and correspondingly.
Some relationships are automatically created with the alias reload process, from this screen they can be set as active/inactive.
In order to automatically apply the changes done in the Alias Relationship (creating or updating the dependencies), you should reload aliases by clicking the Reload Aliases button on the Alias Include / Exclude page.
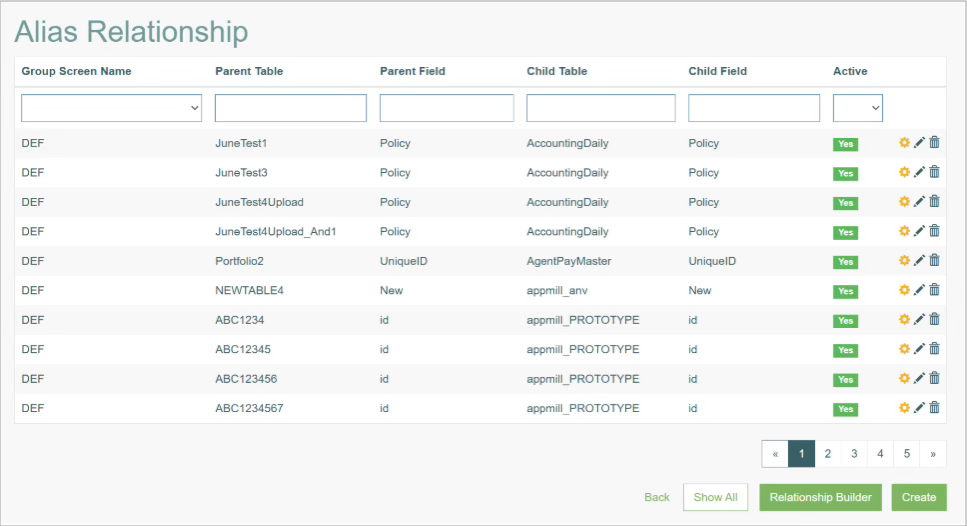
The Alias Relationship Overview page looks as follows:
For more information about the Alias Management, open the Alias Management Overview page of the User Manual.
Search
You can search for a particular Database Field Alias or filter search results. For this, use any of the search filters such as Group Screen Name, Parent Table, Parent Field, Child Table, Child Field, Active and click the Enter key or on any screen place. The screen displays search results if found. To have an overview of all Database Field alias existing the system, leave the filters empty.
Sort Search Results
You can sort search results by the columns in ascending (arranged from the smallest to the largest number and alphabetically for letters) or descending (arranged from the largest to the smallest number and in reverse alphabetical order for letters) order. Columns' names, by which search results can be sorted, are indicated with arrows. Click the appropriate column name to sort search results by it.
Navigate
Use the navigation bar at the bottom of the Overview page to navigate through the pages. Click the appropriate page number to open it. Use the Arrow icons to go to the next page or the previous page of the search results list accordingly.
Create Alias Relationship
There are two ways to create an Alias Relationship: using a Simple Form or the Relationship Builder.
The Simple Form allows you to manually define the Parent Table, Parent Field, Child Table, and Child Field through form input fields.
The Relationship Builder provides a graphical way to visually connect fields between tables using an interface This interface provides an intuitive graphical representation for managing relationships between database tables.
To create a new Alias Relationship between database tables using Simple Form, click the Create button on the Overview page.
To create an Alias Relationship using the graphical tool, click on the Relationship Builder button on the Overview page.
Create Alias Relationship using Simple Form
Click the Create button on the Overview page to create new Alias Relationship between database tables. This opens the page in creation mode.
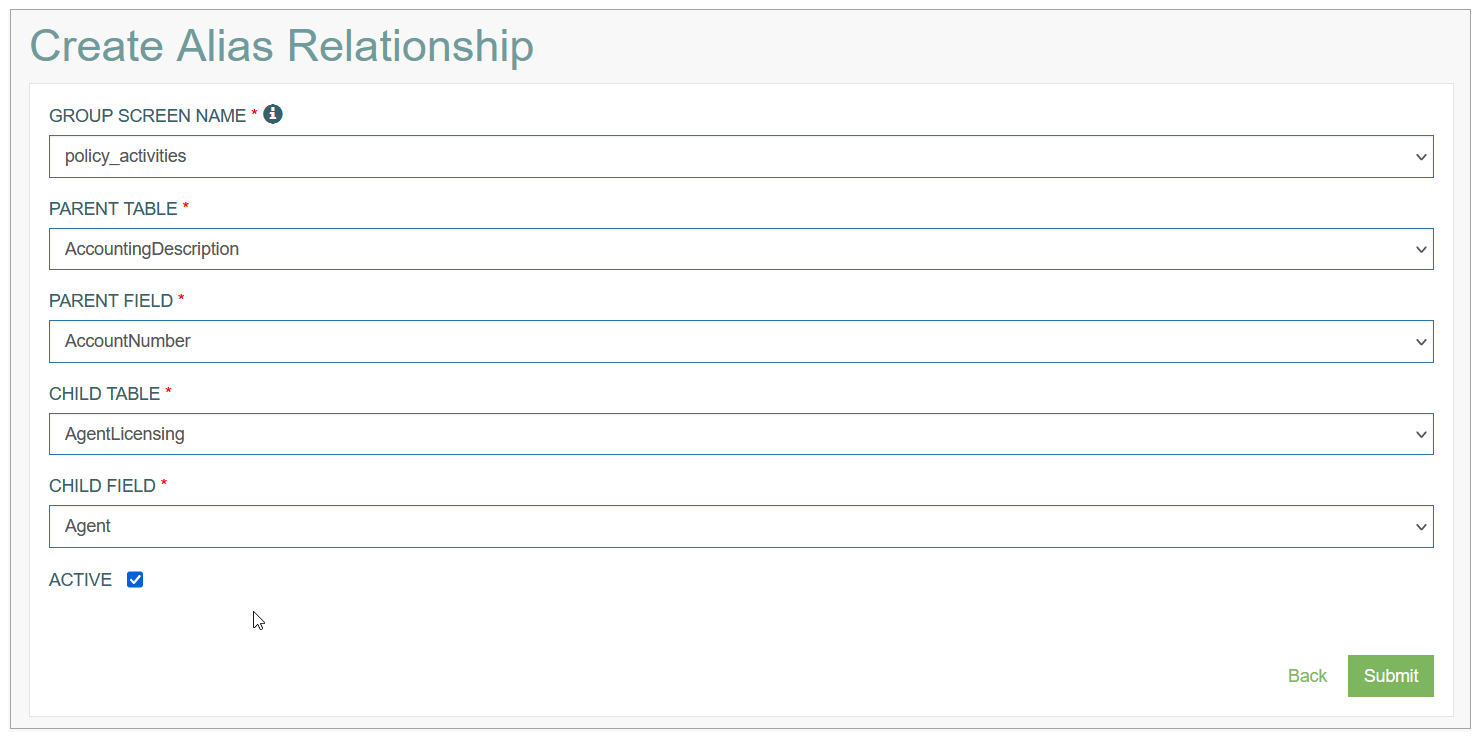
Fill in the following fields:
Group Screen Name - select the Group Screen Name from the drop-down list. This filed is required.
DEF – Select this option if you want this relationship to be used for all screens.
Parent Table - select the database table that will be defined as parent table in the fields relationship.
Parent Field - select the field from the drop-down list. The list is restricted by the selected parent database table.
Child Table - select the database table that will be defined as parent table in the fields relationship.
Child Field - select the field from the drop-down list. The list is restricted by the selected child database table.
Active - select the check box to indicate the created relation as active. As the relations are built automatically, this check box defines if the relation should be taken into account when updating the list of related fields.
All the fields are required and must be filled in before saving.
After entering the data, click the Submit button to save the Database Field alias. To return to the Overview page without saving, click the Back link.
To apply the changes, do not forget to reload aliases by clicking the Reload Aliases button on the Alias Include / Exclude page.
Create Alias Relationship using Relationship Builder
The Relationship Builder provides a graphical approach to defining Alias Relationships. It allows users to visually connect fields between parent table and child table using an intuitive drag-and-drop interface. To create an Alias Relationship we need to define Parent Table, Parent Field, Child Table, and Child Field. Instead of manually entering values, Relationship Builder allows us to define all these fields using visual elements.
To create a new Alias Relationship between database tables using the graphical tool, click the Relationship Builder button on the Alias Relationship overview page. This opens the page in creation mode with a graphical canvas for defining relationships:
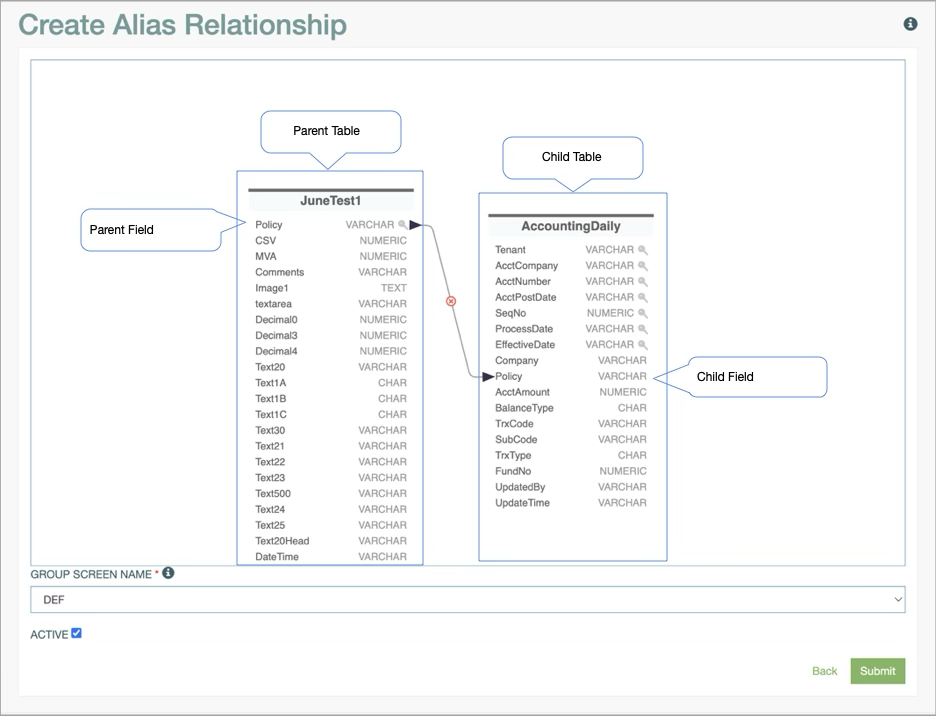
When you create an Alias Relationship using Relationship Builder Parent Table, Parent Field, Child Table, and Child Field will be defined in the canvas and you will have additional form fields for Group Screen Name and Active fields.
Fill in the following fields:
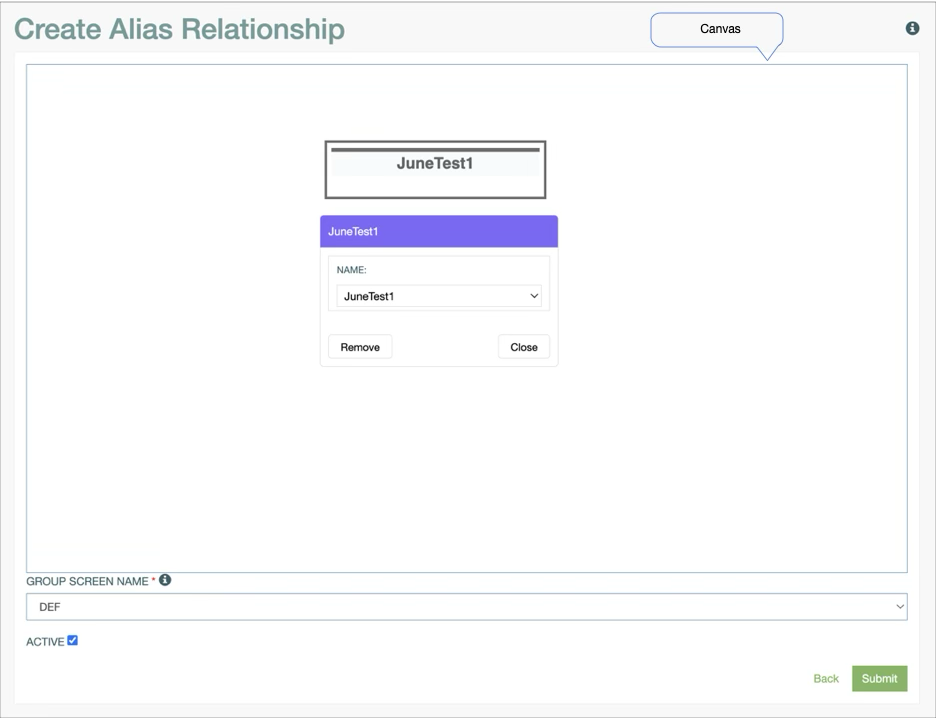
Parent Table - double click anywhere on the canvas to open a pop-up window where you can select the Parent Table name from a drop-down list. After selecting the table from the drop-down list, click Close button, this will load all fields of the Parent Table on canvas. To remove the selected table from canvas, click the Remove button.
See image below:
Child Table - double click again on the canvas to select the Child Table and its corresponding Fields will be available on canvas.
Define Relationship - double click on the field of the Parent table and drag the arrow to the field of the Child Table to establish the relationship between them.
Group Screen Name - select the Group Screen Name from the drop-down list. This field is required.
o DEF – select this option if you want this relationship to be used for all screens.
Active - select the check box to indicate the created relation as active. As the relations are built automatically, this check box defines if the relation should be taken into account when updating the list of related fields.
All the fields are required and must be filled in before saving.
After entering the data, click the Submit button to save the Database Field alias. To return to the Overview page without saving, click the Back button.
Update Alias Relationship
To edit an Alias Relationship, you can use two options:
Editing via clicking the Edit (Pencil) icon for the selected alias relationship entry in the search results table.
Editing via builder (clicking the Gear wheel icon).
Use the Simple Form when making minor changes, such as updating the Active status or updating a Group Screen Name. For more complex modifications involving multiple dependencies, you can use the Relationship Builder as it provides a visual representation of the relationships, making them easier to manage.
Update Alias Relationship using Simple Form
To edit an Alias Relationship, click the Edit (pencil) icon for the selected entry on the Overview page. The Update Alias Relationship page opens for editing.
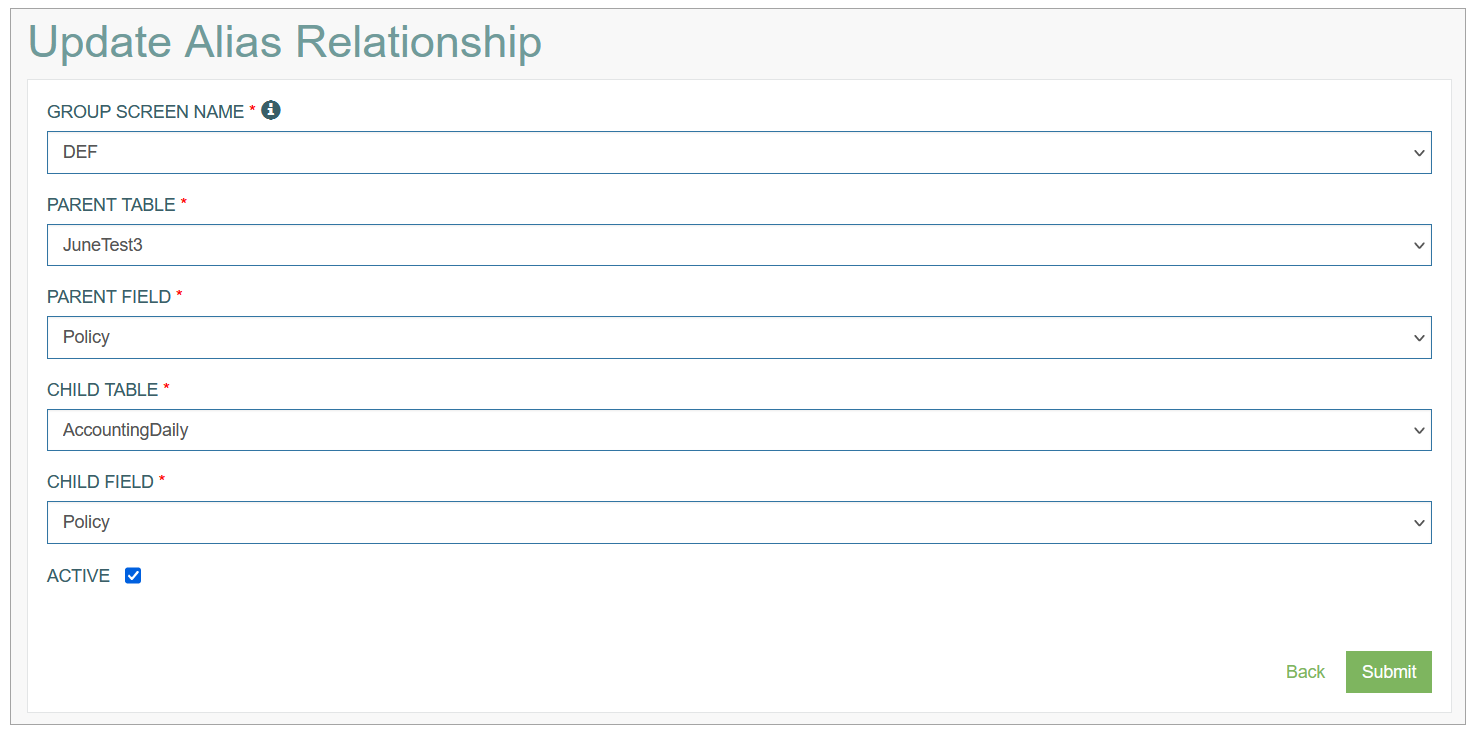
After making the necessary changes, click the Submit button. To return to the Overview page, click the Back link.
Update Alias Relationship Using Relationship Builder
To edit an Alias Relationship using relationship builder, click the Gear icon for the selected entry on the Overview page. The Update Alias Relationship page opens for editing in graphical mode. Click on the arrow connecting the parent and child fields. This will allow you to update the relation between fields. After making the necessary changes, click the Submit button.

To return to the Overview page, click the Back button.
To apply the changes, do not forget to reload aliases by clicking the Reload Aliases button on the Alias Include / Exclude page.
Delete Alias Relationship
To delete an Alias Relationship, click the Delete icon on the Overview page for the selected entry. The confirmation pop-up will appear where you can confirm or cancel the Delete action.