Access
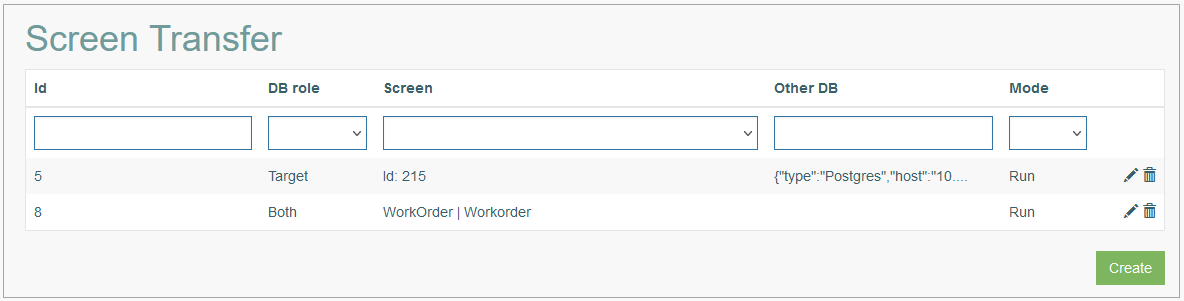
Click Features > Screen Transfer to have an overview of transferred screens and manage them.
Table of Contents
Overview
The Screen Transfer functionality is designed to update screens or transfer them between the source and target (destination) databases. For example, when upgrading to a new database, the Screen Transfer functionality allows users to transfer their settings and data from the old database to the new one. Or, in case users work on cross-platform applications, they can use the Screen Transfer functionality to test their software on various devices and screen sizes, ensuring a consistent user experience.
When transferring, only the data for the screen is modified if it exists in the target database. Additionally, related data such as lists, custom queries, notifications, etc., will be generated if they do not exist yet, or users may be prompted to verify them manually.
Search
To search for a required screen transfer or filter the search results, use the following search filters:
ID - the Screen Transfer entry ID.
DB role - the database role.
Screen - the name of the transferred screen.
Other DB - the name of the source or target database.
Mode - the Screen Transfer mode.
After filling in the filters, click the Enter key or any screen place. The screen displays search results if found. Please note, that letters or part of the word entered in the search filter fields will be taken into account while searching as well.
Navigate
Use the navigation bar at the bottom of the Screen Transfer Overview page to navigate through the pages. Click the appropriate page number to open it. Use the Arrow icons to go to the next page of the previous page of the search results list accordingly.
Click the Show All button to display all the results on one page.
Create Screen Transfer
To create the Screen Transfer, click the Create button. This opens the Screen Transfer Create page with forms that should be filled in.
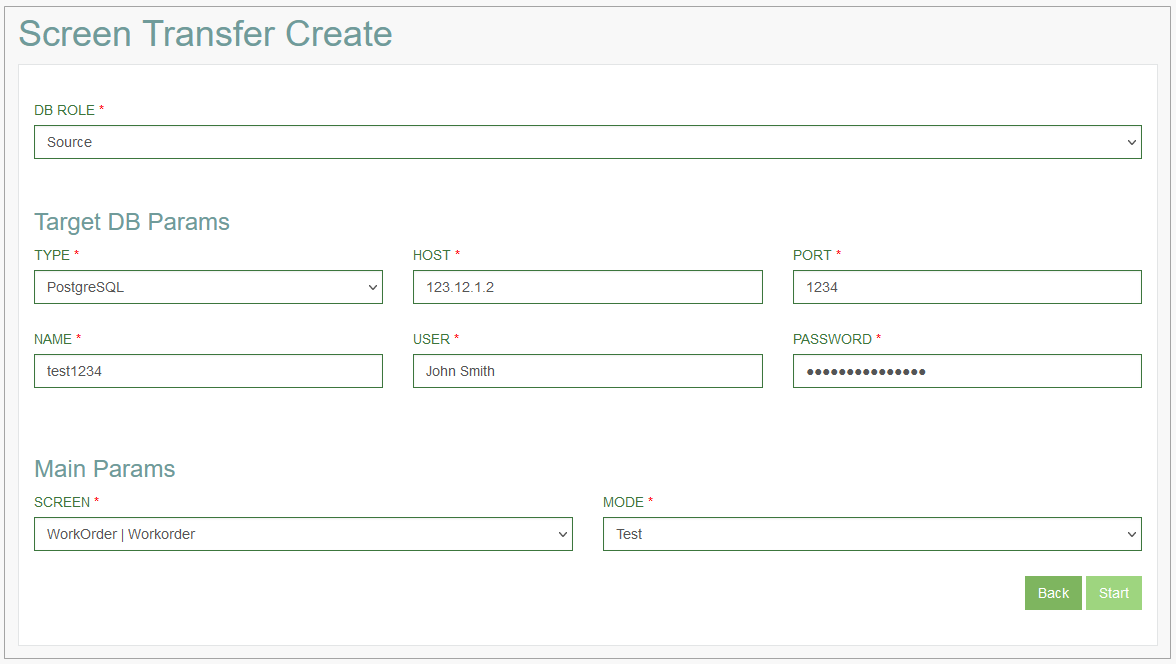
Fill in the following fields (all fields are mandatory):
DB Role - this parameter signifies the role in which the connected service will use the associated database.
Select the database role from the drop-down list:
Source - select this role to define the database as a source one. I.e., that the screen of this database will be transferred to the destination (target) database.
Target - select this role to define the database as a target one. I.e., that the screen from the source database will be transferred to this destination (target) database.
Both - select this role to transfer screen within one database. Also, this role verifies the accuracy of transferred screens manually. For example, it enables the validation of IDs for Extension function and screens referenced in links.
Depending on the value in the DB Role field the Target DB Parameters or Source DB Parameters section appears.
Target DB Parameters
The Target DB Parameters (Target DB Params) section is displayed in case the Source database role is selected. Enter the data to the fields below, to define the target database:
Type - select the database type from the drop-down list:
PostgreSQL
OracleSQL
MicrosoftSQL
MySQL
Host - enter the database host.
Port - enter the database port.
Name - enter the database name.
User - enter the username.
Password - enter the database password.
Source DB Parameters
The Source DB Parameters (Source DB Params) section is displayed in case the Target database role is selected. Enter the data to the fields below:
Type - select the database type from the drop-down list:
PostgreSQL
OracleSQL
MicrosoftSQL
MySQL
Host - enter the database host.
Port - enter the database port.
Name - enter the database name.
User - enter the username.
Password - enter the database password.
In case the Target database role is selected the Get Source Screen List button appears. Click the Get Source Screen List button to access the source database screen list.
Main Parameters
In the Main Parameters (Main Params) section define the following parameters:
Screen - select the screen to be transferred from the drop-down list.
Mode - select the mode, in which the Screen Transfer will be created, from the drop-down list:
Test - executes all required checks, but the modifications will not be implemented into the target database.
It is recommended to use this mode prior to switching to the Run mode to gather information about different data, such as variations in Custom Query or ID for Extension function between the source and target databases.Run - executes all required checks, and all modifications will be implemented into the target database at once.
Additional Parameters
The Additional Parameters section appears if in the Main Parameters section the Run mode is selected. For the Test mode, the Additional Parameters section will not be displayed.
In the Additional Parameters section users can select which Custom Query, List, Document Family, and Group Screen data from the source database will be transferred and updated in the target database.
Define the parameters for the following fields:Custom Query - select the parameter from the drop-down list:
Create and use a new one - to save both the source and target database custom queries in the target database.
For example, in both the source and target databases, there are two custom queries with the same name but a different function used. To avoid errors, it is necessary to keep both custom queries. As a result, after the screen is transferred, in the target database there will be two custom queries: the old one and a new one with the same name and prefix. The prefix will be added automatically by the system. The new custom query will be used on the transferred screen. The old custom query can still be used on the other screens.Update - to update the custom query in the target database without saving the old custom query. In this case, new custom query will replace the old one.
List - select the parameter from the drop-down list:
Create and use a new one - to save both the source and target database lists in the target database.
For example, in both the source and target databases, there are two lists with the same name but different list options used. To avoid errors, it is necessary to keep both lists. As a result, after the screen is transferred, in the target database there will be two lists: the old one and a new one with the same name and prefix. The prefix will be added automatically by the system. The new list will be used on the transferred screen. The old list can still be used on the other screens.Update - to update the list in the target database without saving the old list. In this case, new list will replace the old one.
Document Family - select the parameter from the drop-down list:
Create and use a new one - to save both the source and target database document families in the target database.
For example, in both the source and target databases, there are document families with the same name but different parameters used. To avoid errors, it is necessary to keep both document families. As a result, after the screen is transferred, in the target database there will be two document families: the old one and a new one with the same name and prefix. The prefix will be added automatically by the system. The new document family will be used on the transferred screen. The old list can still be used on the other screens.Update - to update the document family in the target database without saving the old document family. In this case, new document family will replace the old one.
Group Screen - select the parameter from the drop-down list:
Create and use a new one - to save both the source and target database group screens in the target database.
For example, in both the source and target databases, there are group screens with the same name but different parameters used. To avoid errors, it is necessary to keep both group screens. As a result, after the screen is transferred, in the target database there will be two group screens: the old one and a new one with the same name and prefix. The prefix will be added automatically by the system. The new group screen will be used on the transferred screen. The old list can still be used on the other screens.Update - to update the group screen in the target database without saving the old group screen. In this case, new group screen will replace the old one.
Click the Start button, to execute the Screen Transfer process. The results of the Screen Transfer process execution will be displayed below in the Result section.
Click the Back button, to cancel the Screen Transfer process and return to the Screen Transfer Overview page.
After the screen transfer, a record of the screen's previous state will be added to the target database. In a service where the target database is the main one, users can access the previous screen state on the Screen Backup page (Features > Screen Backup). For more details about the screen backup process, refer to the Screen Backup page of the User Manual.
Additionally, users have the option to restore the earlier state on the Screen Rollback page (Features > Screen Rollback). For more details about the screen rollback process, refer to the Screen Rollback page of the Use Manual.
Update Screen Transfer
To update a Screen Transfer entry, click the Edit (pencil) icon for the selected Screen Transfer entry in the search results table. The Screen Transfer Update page opens for editing.
After making the necessary changes, click the Start button.
In case the Screen Transfer entry in the Run mode is updated, a new screen transfer process will be performed, and a new Screen Backup will be created for the target database.
To return to the Overview page, click the Back link.
Delete Screen Transfer
To delete a Screen Transfer entry, click the Delete icon on the Overview page for the selected Screen Transfer entry. The confirmation pop-up will appear where you can confirm or cancel the action.