Access
Click Account Settings > Security Filters to access the Security Filter functionality.
Table of Contents
Overview
The Security Filters functionality provides the possibility to manage security levels for users. I.e., using security filters users can restrict the data accessibility and search results based on the predefined parameters and set the authentication methods based on their security level in both the Architect and Render applications.
In the Architect application, users can see the filtered results, for example, when downloading a table from the Tables page (Features > Tables), or using the SQL query on the SQL Query Window page (Features > SQL Query Window).
In the Render application, users can see the filtered results on the screen.
Search
To have an overview of all security filters existing in the system, search for a particular filter or filter the search results, enter Tenant, Account Type, User Type and Description and click the Enter key or click on any screen place. The screen displays search results if found.
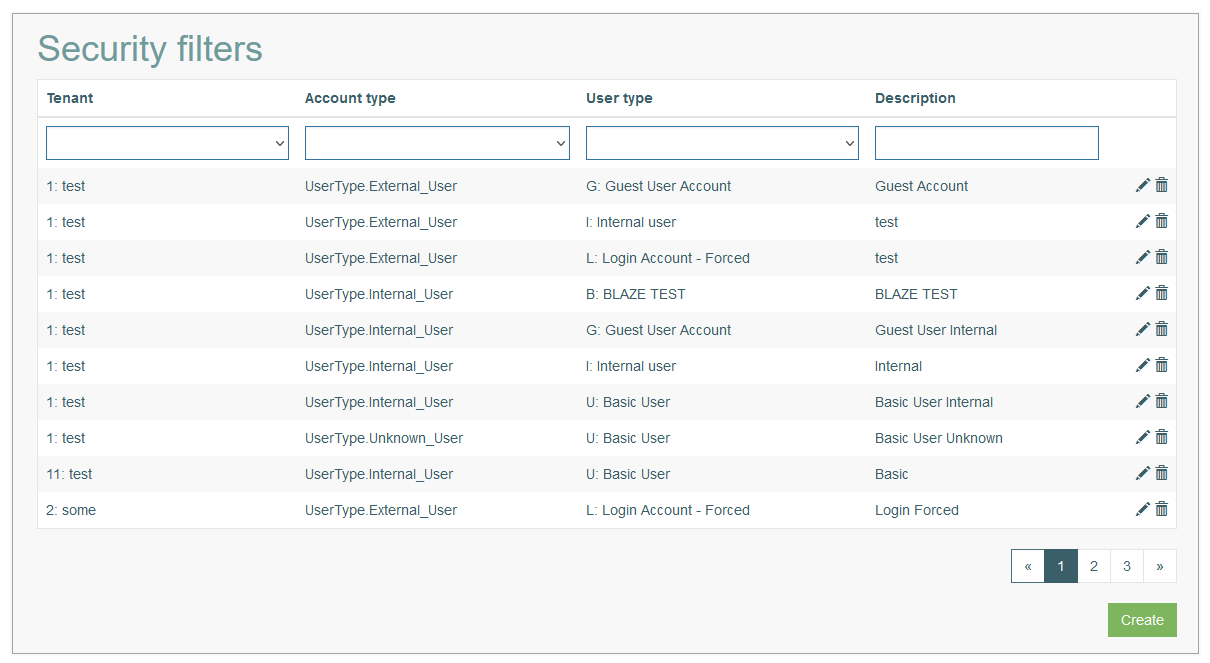
Navigate
Use the navigation bar at the bottom of the Search Result page to navigate through the pages. Click the appropriate page number to open it. Use the Arrow icons to go to the next page or the previous page of the search results list accordingly.
Create Security Filter
Click the Create button on the Search Result page to create a new Security Filter.
This opens the page in creation mode.
The Security Filter is created based on three required parameters:
Tenant
Account Type
User Type
The combination of these 3 parameters is set on user level as well. The combination of these parameters on user level and security filter specifies the security level and restriction for a particular user in the Render.
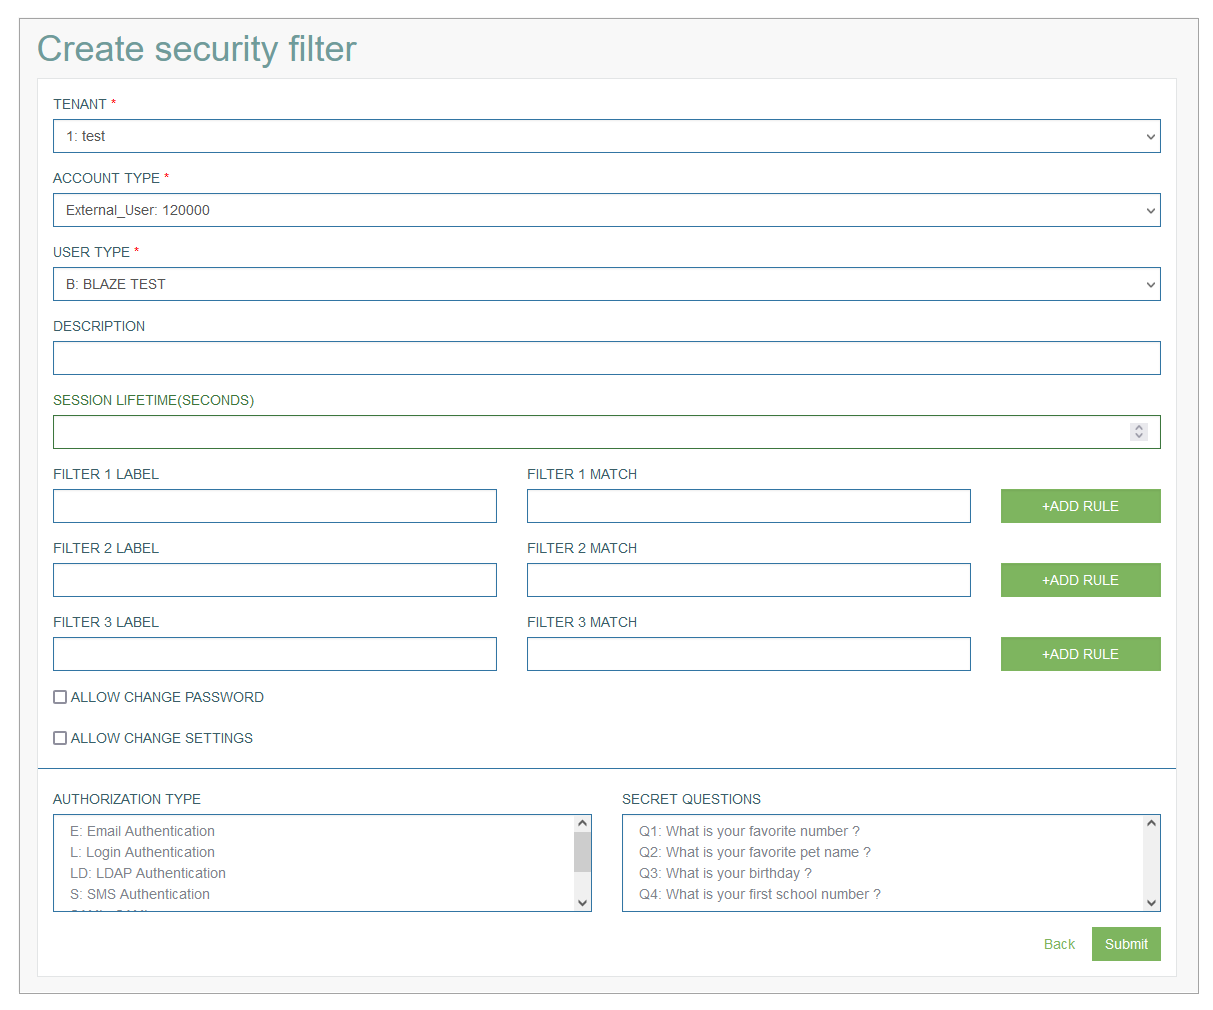
To create the security filters, fill in the following required fields:
Tenant – select a Tenant from the drop-down list.
Account Type – select an Account Type from the drop-down list.
User Type - select a User Type from the drop-down list.
Specify other parameters:
Description - enter a clear description for a created Security Filter.
Session Lifetime (seconds) - specify the session lifetime time in seconds. That means that the system will retain a login session the defined time.
The default value of the session Lifetime is 1200 seconds (20 minutes). After 20 minutes of inactivity, an open session expires automatically and you have to log in again. After the session expiration, any changes you have made will be lost.
Filters - specify the 3 filters to restrict the data that will be available for the users within this security filter. Define the following parameters:
Filter Label - enter a text that will be displayed for the filter on the user account page. In case you leave the field empty, the corresponding Security Filter label will be displayed.
Filter Match - enter a field name that will be used for filtering. By default, the search filter is applied to all tables until you add a rule and select a particular table.
Let’s take a look at an example:
User enters the value “ID“ in the Filter Match field without adding any Filter Rule. During the search, the system will check the value that is specified for the Security Filter in the user account.
In case the specified value is not found, no search results will be displayed in the Architect or Render applications.
In this case, the result can be as follows:
in the Render application, the search will be performed based on the ID field in all tables.
in the Architect application, users can also get search results based on the ID field in all tables:
performing the SQL query (Features > SQL Query Window),
orwhen downloading a table by clicking the Download data to csv button on the Update Table page (Features > Tables).
Users can create 3 Filters only and define 3 pairs of Filter Label and Match accordingly.
Add Rule - click this button for a particular Filter entry to add specific rule and restriction to the filter. The rule will be applied to the selected table.
The Filter Rules pop-up window opens:
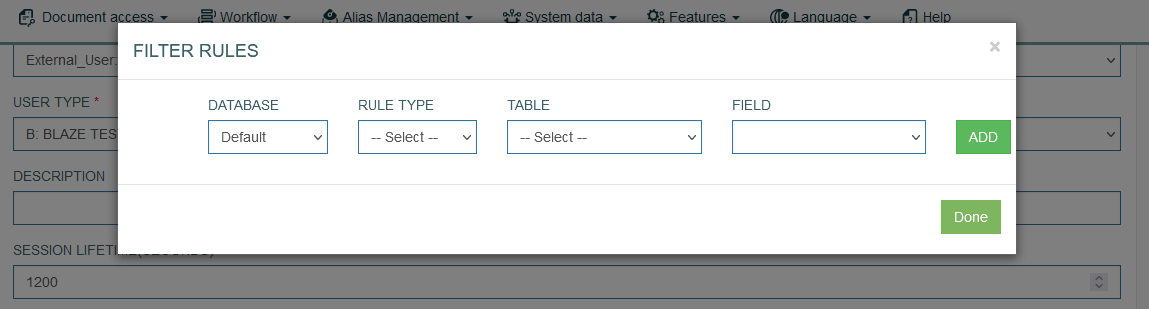
You can define the following parameters:
Database - select the database from the list of available databases. By default, the current database is selected.
Rule Type - select the rule type that will be applied to the filter. Currently, we support the following rule types:
Exclusion - defines that the table selected in the rule will be excluded from the search filter.
Inclusion - defines that the field specified in the rule will be handled by the system in the same way as a field specified on the Filter level. The value specified in the user account will be searched taking this inclusion into account.
Table - select a database table to restrict the search filter to this particular table. In case the table is not selected, the search filter will be applied to all existing tables.
Field - select the field from the drop-down list. The selection list is filtered by the selected table.
Click the Add button to apply the changes. Click the Done button to save the data and close the pop-up window.
On the Security Filter page, proceed with specifying the details:
Allow change password - select the check box to display the corresponding menu item in the user menu in the Render. In case the check box is unselected, users will not have the possibility to change the password from the Render.
Allow change settings -select the check box to display the Settings menu item in the user menu in the Render. In case the check box is unselected, users will not have the possibility to customize the style from the Render.
Authorization type - defines the method of authentication. This is reasonable for users of different security levels. Currently we support the following types of authorization:
E: Email Authentication - can be used as additional parameter to the Login Authentication. An authorization code will be sent to the email address defined in the user account.
L: Login Authentication - is a standard authentication via Login Name and Password.
LD: LDAP Authentication - is used as the authentication protocol utilized by SSO system that enables access to a number of systems with a single login. In this case the user will see the standard login page with login data (Login name and Password) to fill in. The user login data will be sent to LDAP server for checking.
S: SMS Authentication - is used as an additional security parameter to send an authorization code when a user logs in into the system. It will be sent to the phone number defined in the user account.
SAML: SAML - in case of SAML Authentication, the login page will be retrieved by a special secured server where you enter the login data (Email and Password) to log in into the system.
SQ: Secret Question Authentication - is used for the Self-Registration feature. On the Login page, when user clicks the Need an Account button, the Self-Registration screen appears. The Secret Questions are displayed in the Account Protection section. To define what questions to be displayed, select the secret questions from the list displayed on the right from the Authorization type.
Update Security Filter
To edit a Security Filter, click the Edit (pencil) icon for the selected group entry in the search results table. The Update Security Filter opens for editing.
After making the necessary changes, click the Submit button. To return to the Security Filter Overview page, click the Back link.
Delete Security Filter
To delete a Security Filter, click the Delete icon on the Overview page for the selected Security Filter. The confirmation pop-up will appear where you can confirm or cancel the action.