Access
Click Features > Report Builder to manage report templates used for the report generation on the Render screens.
Table of Contents
Overview
The Reports functionality provides the possibility to manage reports that can be generated in the Render application.
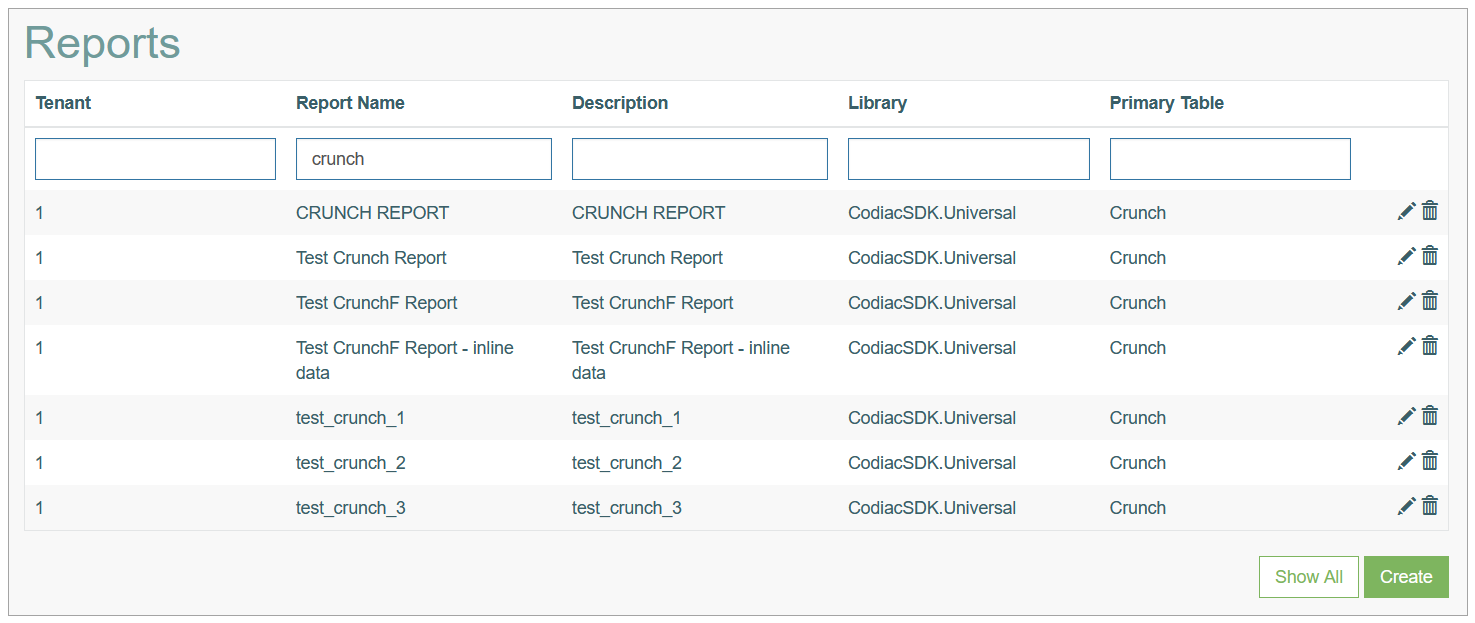
Search
To search for a particular report or filter the search results, use the following search filters and enter any or all the search criteria:
Tenant
Report Name
Description
Library
Primary Table
After filling in the filters, click the Enter key or any screen place. The screen displays search results if found. Please note, that letters or part of the word entered in the search filter fields will be taken into account while searching as well.
Sort Results
You can sort search results by the columns in ascending (arranged from the smallest to the largest number and alphabetically for letters) or descending (arranged from the largest to the smallest number and in reverse alphabetical order for letters) order. Columns' names, by which search results can be sorted, are indicated with arrows. Click the appropriate column name to sort search results by it.
Navigate
Use the navigation bar at the bottom of the Overview page to navigate through the pages. Click the appropriate page number to open it. Use the Arrow icons to go to the next page of the previous page of the search results list accordingly.
Click the Show All button to display all the results on one page.
Create Report
Click the Create button on the Overview page to create a new report. This opens the Create Report page.
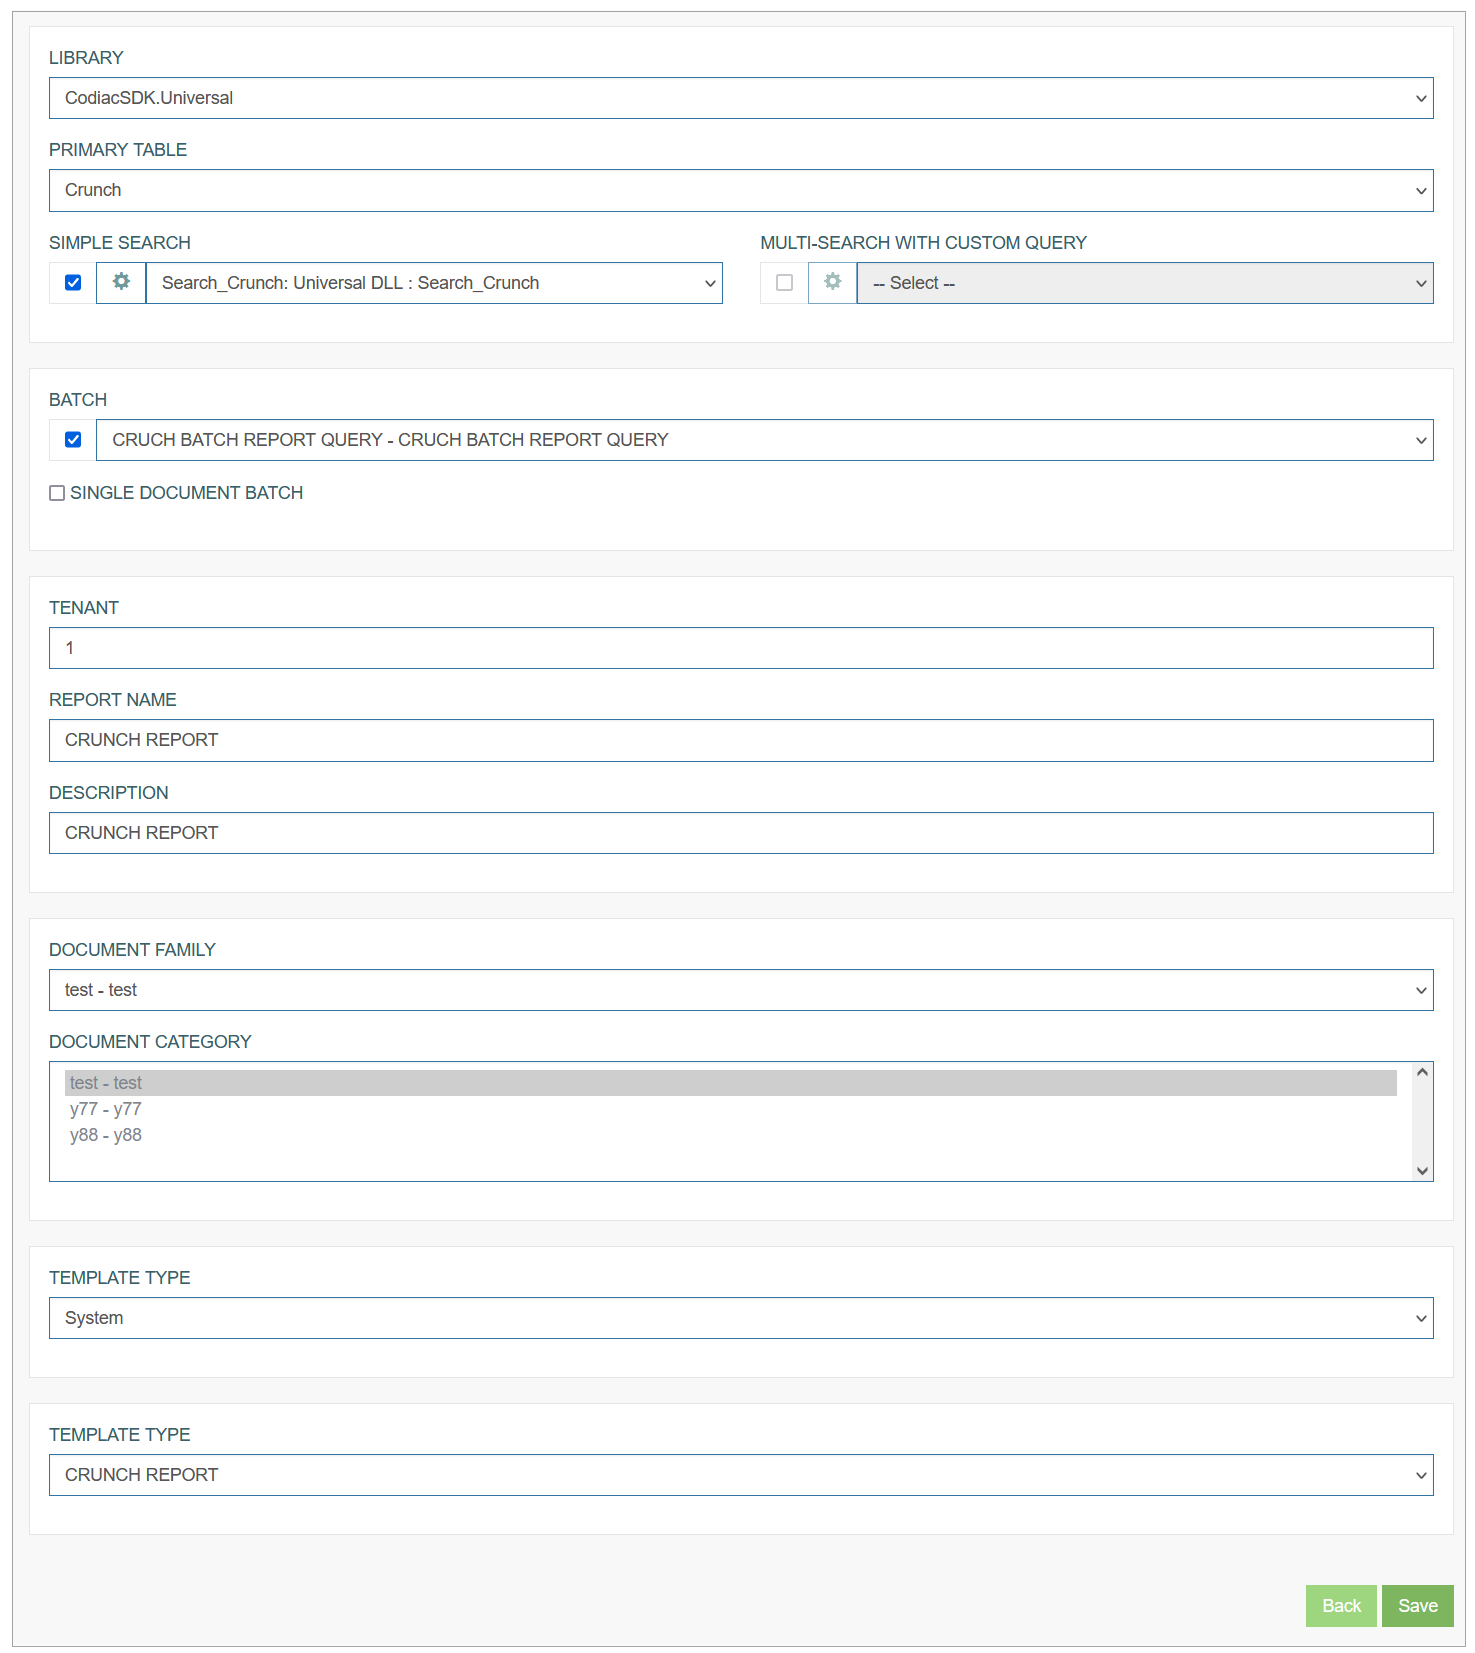
Fill in the following fields:
Library - is always the same and not editable.
Primary Table - select the primary table you need to use for the report.
Search - select the search type (Simple search or Multi-search) and configure the search parameters. The search configured here will define what will appear in the pop-up when user clicks the Generate Report button on the screen in the Render. User will need to search for data on the Render screen and based on the selected data, the report will be generated.
Batch - represents different queries that will return the same data as search result but multiple values. The batch option provides the possibility to create multiple reports at once. In contrast to the search, where user an select only one value from the available values, in the batch user can input multiple values. In this case the multiple reports can be generated.
Single Document Batch - select this option to define that the multiple reports should be generated not into multiple documents but into one common. This is a special case of the Tenant report generation.
Tenant - enter the Tenant that connected to the report.
Report Name - enter the name for the report to be generated. The report name will be used further to generate report from plugins or to call the specific report. This name will be displayed in the Screen Builder options.
Description - add a short description for the report.
Document Family - select the document family. After the family selection, the list of connected categories will be available.
Document Category - select the document category from the drop-down list.
The Document Family and Category values are very important for the report. Selecting the Document Family and Category user specifies the storage (device), in which the created report will be saved. On the Document Family page (Document Access > Document Family), we can specify the retention time (in days) to store reports in the storage (device). This can be useful to save space on your device. If the retention time is not defined, all reports will be stored there until the folder is full. Note that if the folder is full of files, new files will replace the old ones.
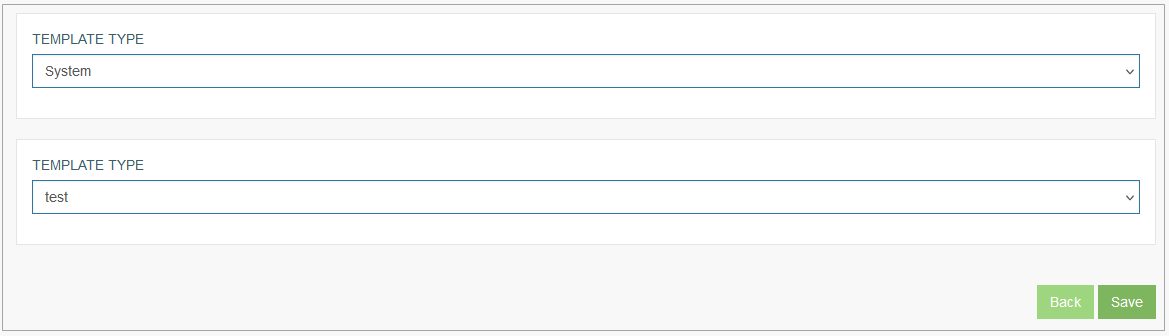
Template Type - define which template should be used for report generating. Currently the following template types are supported:
System
XML file
Editable
PDF Form
System Template Type
The System Template type refers to the report templates that already exist in the system. These report templates are created via a designer application and can be just selected and used for the report generation.
The report templates can be created using both web and desktop versions of the designer application. One report template can be edited using both the web and desktop versions of the designer application. For example, a new report template is created in the application web version and then updated in the desktop version.
The web designer application can be accessed by the link containing the part of the Architect application link with the web designer name. For example, localhost:88/architect/webdesigner/.
The desktop application can be accessed by running the QtRptDesigner.exe file in the QtRptDesigner folder. The path to the application can be as follows: C:/Program Files/AppMill/Clients/QtRptDesigner/QtRptDesigner.exe.
All report templates created via a designer application can be selected from the Template Type list.
Select the needed report from the Template Type list of all reports existing in the system.
System Template Usage Example
In the example described below, the report template is created using the web designer application.
Note that the desktop version of the designer application can also be used for creating the report template.
To create the report template using the web designer application, open the web designer application in the internet browser and perform the following operations:
Add a PDF file to be used as a report template
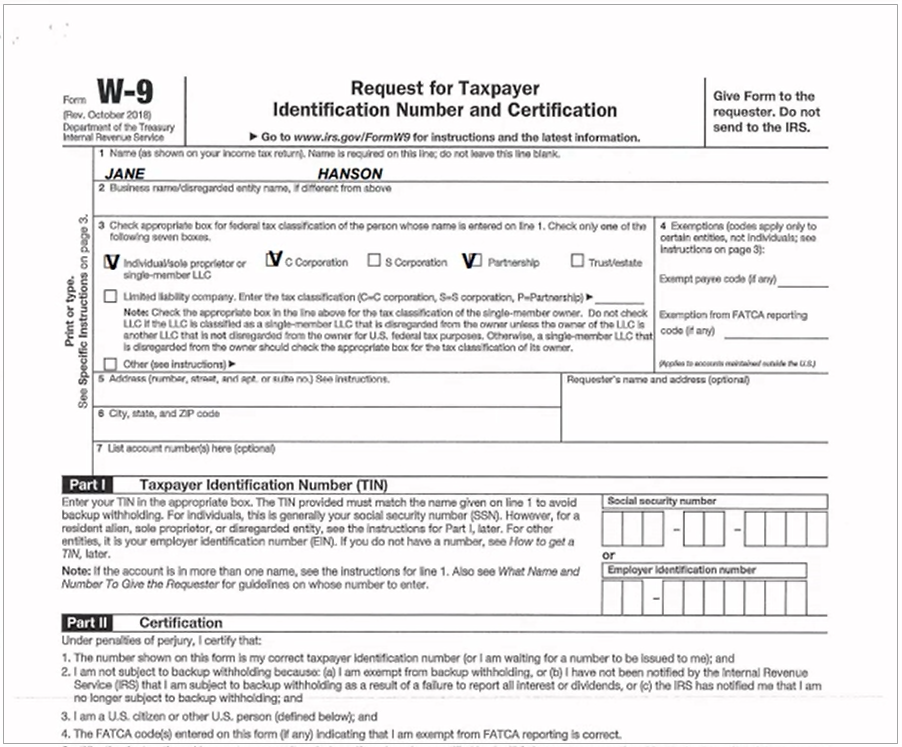
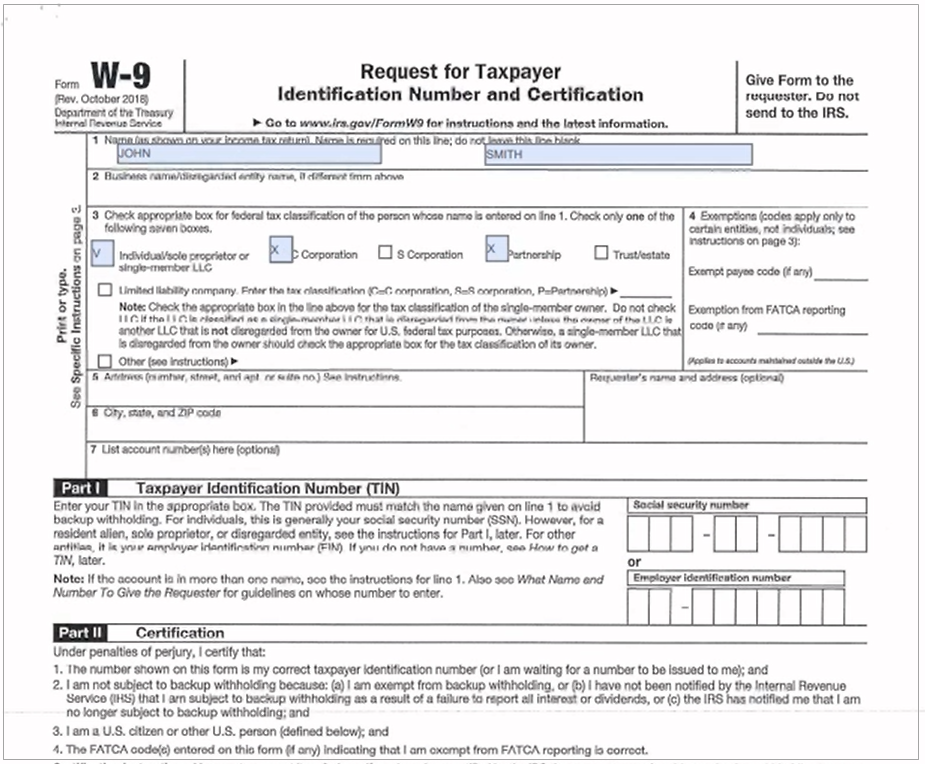
Select the PDF->Report icon from the Toolbar at the top of the page. In the opened PDF->Report pop-up window, select the PDF file to be utilized as a report template. For example, we upload the W-9 form of the Request for Taxpayer Identification Number and Certification. This document may contain the user's personal information, such as their first and last names, email address, phone number, and so on.
Reduce the file size
Reduce the report template size to have access to the free space on the page. This should be done to insert a new report template element into the existing one.
Add aliases
Add aliases to the report template to connect the report template with the data from the database tables. For that, click the Add new text icon from the Toolbar on the left.
In the opened Field editor pop-up window, search the alias in the Aliases field. Select the corresponding alias from the search results.
The alias name should be in the square brackets. Otherwise, the alias will not apply the correct data and will be displayed as regular text. If there is any text outside the square brackets, just delete it. Ensure that the text area contains only the alias in the square brackets.
In this example, to display the user’s first and second names, we add the aliases containing the user’s first and second names to the area where the user’s first and second names should be placed.
Also, the marked check boxes can be set to be displayed in the generated reports. For that, the alias should contain the checkbox value.
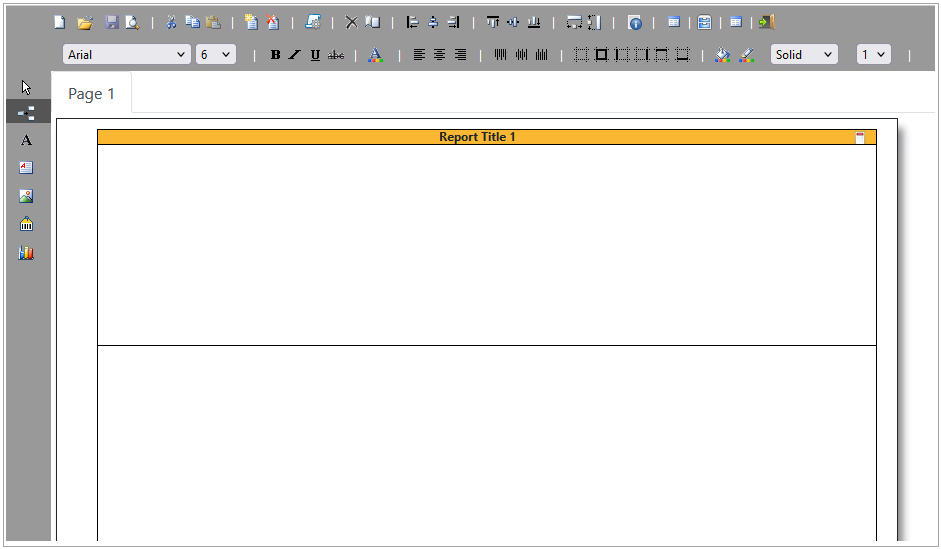
As a result, the created template can be displayed as follows:

Define a primary table
Select the Table icon from the Toolbar at the top of the page. In the opened Tables pop-up window select a primary table.
Preview a template
To preview a report template, click the Preview icon from the Toolbar at the top left corner of the page.
Note that to preview the report template in both web and desktop designer applications, the following parameters are required to be defined on the Document Groups page:
Document Family - select the system document family.
Document Category - select the system document category.
Access Rights - select the Full Access option.
Save a template
To save a created report template, we need to select the Template icon from the Toolbar at the top center of the page. In the opened Templates pop-up window, to save a new report template, enter the report template name into the Template saving field and click the Save as new icon.
If you click the Save icon from the Toolbar at the top left corner of the page, that will save the changes of the PDF file but will not save a new report template.
Note that clicking the Close button will save the report template and close the Templates pop-up window. To cancel the data saving and close the Templates pop-up window, click the Close icon at the top right corner of the pop-up window.
After that, the created report template will be added to the list with report templates for the report of System type on the Report Builder page.
To create the report of System type, define the following parameters on the Report Builder page:
Template Type - select the System template type from the drop-down list.
Template Type - in the appeared field, select the above-created report template.
Save the report of System type by clicking the Save button.
To enable the possibility to generate reports on screens in the Render application, set up and add the button of the Generate report type to the screen in the Architect application. In the Render application, clicking the button of the Generate report type will generate a report. For more details about button configuration, refer to the Button Configuration page.
In the Render application, the generated report of the System type can be displayed as follows:
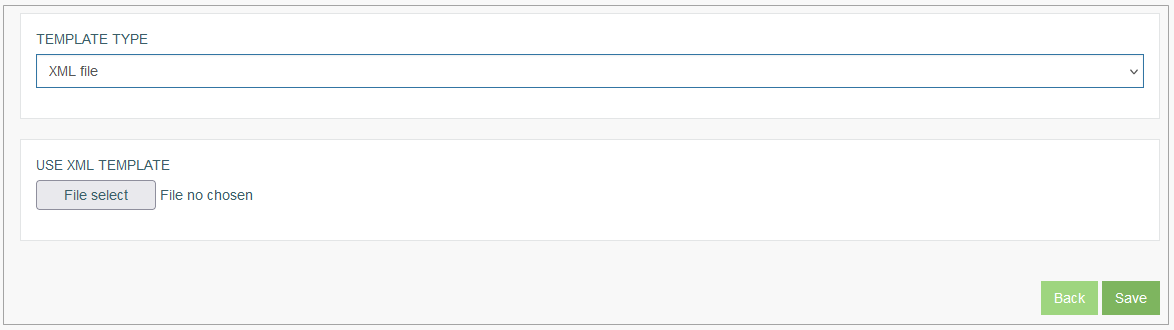
XML File Template Type
The XML File Template type provides the possibility to upload an XML file. The file will be added to all the templates and user will be able to use it for the report generation.
Editable Template Type
There are several report templates that are predefined as XML files. So, users do not need to create the report templates from scratch via the designer applications. The users will only need to adjust existing predefined templates with the required details and information. That could be helpful for some specific routine tasks.
In the Select Template section, you can select the following options:
Document Type
Form Letter - this template has the letter form. The generated report is displayed as a regular letter, complete with a title, body details, address, and pagination.
Reports - is used for the creation of simple reports containing calculations. The generated report is displayed as a table with columns, rows, and total calculations by parameters according to the report template.
Available Templates
The report templates in the Available Templates drop-down list can vary according to the selected report type in the Document Type drop-down list. All templates from the Available Templates drop-down list are uploaded by the system during the AppMill Service installation process and placed in the AppMill\Service\ReportTemplate\FormTemplateFolder and AppMill\Service\ReportTemplate\ReportTemplateFolder folders for Form Letter and Reports document types correspondingly.
Based on the report template selected from the Available Templates drop-down list, the Enter Report Details section will show the various details displayed below. Users can use these details of the predefined template as a starting point and adjust the report according to their requirements.
Users can perform the following operations with report template parameters:
Upload a new logo (image title)
Adjust settings for the uploaded image
Enable and disable the sections visibility
Change the data formatting entered in the columns and the fields
Enter the data into free form section
Depending on the selected report template, different report details can be displayed and be adjusted. Actually, users can build a completely custom report based on the predefined set of functionalities.
Form Letter
According to the report template selected in the Available Templates drop-down list, the Enter Report Details section will contain the different details displayed for the Form Letter report templates.

For the Form Letter report templates the following parameters can be edited in the Enter Report Details section:
Image Title - select and upload an image from the local device to be used as a letter title.
Image Width - define the image width.
Image Height - define the image height.
Left - define the image placement. By default, the image title is placed at the top left corner of the page.
Visibility - select the check box to display the image title in the report.
Image Title - select and upload an image from the local device to be used as a letter title.
Image Width - define the image width.
Image Height - define the image height.
Left - define the image placement. By default, the image title is placed at the top right corner of the page.
Visibility - select the check box to display the image title in the report.
Sender Section Visibility - select the check box to display the sender details (sender and recipient addresses) in the letter. Users can display the Sender section details only in the reports based on the report templates containing the sender and recipient address.
Header Visibility - select the check box to display the Image Titles in the report header. If the report template has more than 1 page, select the check box for page 2 or page 3 to display the Image Titles on the corresponding pages.
Free Form Section - enter the letter body to this section. The body can be in free form including text and aliases. The aliases can be added to the letter body to connect the report template with the data from the database tables.
Note that the aliases should be placed in the square brackets. Otherwise, they will be shown as regular text. In the Render application, the generated report will contain the data according to the aliases in the report templates.
If the report template has more than 1 page, the Free Form Section for page 2 and page 3 appears correspondingly.
To check how the report of the Form Letter type will look like, use the Report Preview option. For this, click the Generate Preview button in the bottom left corner of the page. This will generate the Report in the PDF format.
Form Letter Template Usage Example
In the example below, the creation and usage of the report template of the Form Letter type in the Render application are described.
But first, the report template of the Form Letter type should be created in the Architect application. As an example, we create the report template with the welcome onboarding letter for new employees containing the regular text and aliases in square brackets. The further generated report will display the regular text and data according to the aliases.
To create the report template of the Form Letter type, fill in the following parameters on the Report Builder page:
Document Type - select the Form Letter template type.
Available Templates - select the 1 Page Freeform.xml template.
Image Title - upload the image to be displayed as a letter title at the top left corner.
Image Title - upload the image to be displayed as a letter title at the top right corner.
Free Form Section - enter the welcome onboarding letter body containing the regular text and aliases in square brackets.
Save the created report by clicking the Save button.
After that, set up and add the button of the Generate report type to the screen in the Architect application. In the Render application, clicking the button of the Generate report type will generate a report. For more details about button configuration, refer to the Button Configuration page.
In the Render application, the generated report of the Form Letter type can be displayed as follows:

Reports
According to the report template selected in the Available Templates drop-down list, the Enter Report Details section will contain the different details displayed for the Reports report templates.
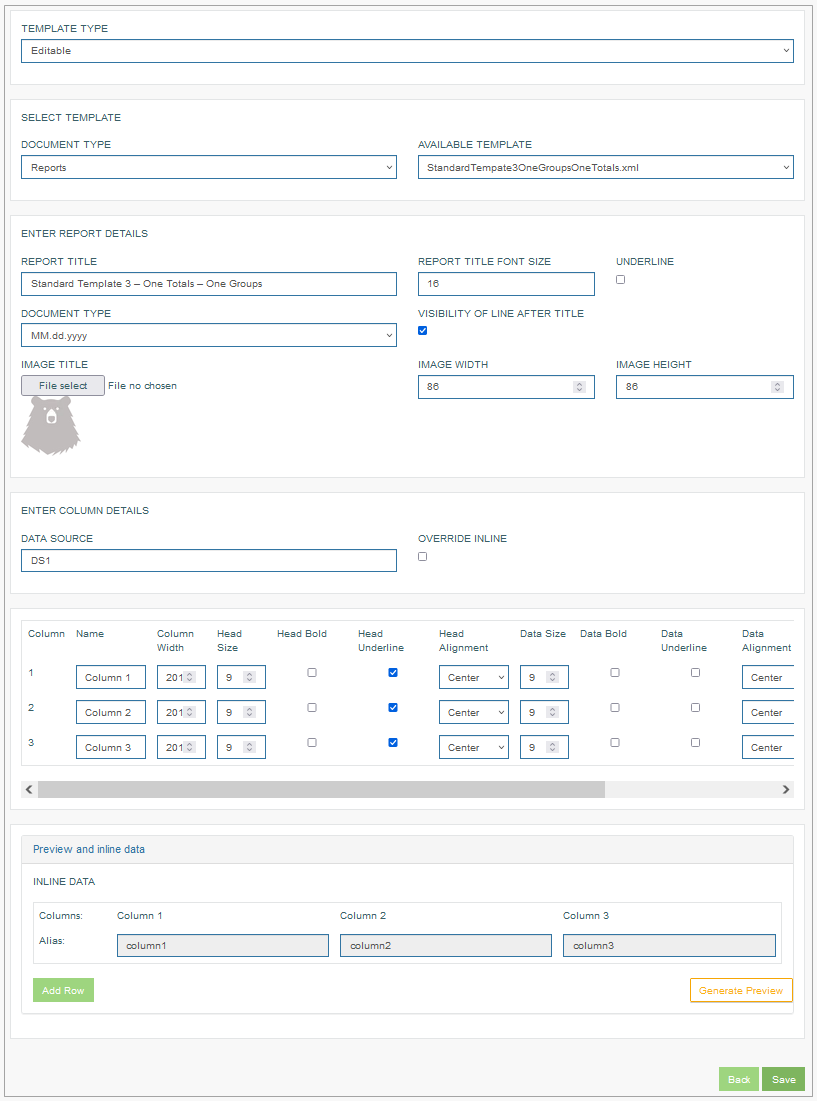
For the Reports report templates the following parameters for the title can be edited in the Enter Report Details section:
Report Title - by default, the Report Title field contains the value according to the selected template in the Available Template field. Enter a text to be used as a title in the generated report.
The title can contain text and aliases. Note that the aliases should be placed in the square brackets. Otherwise, they will be shown as regular text. In the Render application, the generated report will contain the data according to the aliases in the report templates.Report Title Font Size - define the report title font size.
Underline - select the check box to underline the title.
Document Type - select the date format from the drop-down list.
Visibility of Line after Title - select the check box to display the line after the title.
Image Title - select and upload an image from the local device.
Image Width - define the image width.
Image Height - define the image height.
In the Enter Column Details section, define the Data Source details:
Data Source - by default, the field is predefined with a DS1 value. Also, the parent table identifier alias can be used as the Data Source instead of default DS1.
DS1
Override Inline - select the check box. The Override Inline check box should be selected for the DS1 data source. If this check box is selected, the report generated in the Render application will contain the correct data from the database. Otherwise, the report will display the data added in the Preview and inline data section as an example for the preview.
Parent table identifier alias
To connect the report template to the database table, the Parent table identifier alias can be used.
Note that if the parent table identifier alias is used as a Data Source in the report template, the data added in the Preview and inline data section for the preview will be ignored.
In the Enter Column Details section, the following parameters can be adjusted for every column separately:
Name - enter a column name.
Column Width - define a column width.
Head Size - define a column header size.
Head Bold - select this check box for a column to put the column header in bold.
Head Underline - select this check box for a column to underline the column name.
Head Alignment - select the alignment for the column header:
Left - to align the header left.
Center - to align the header center.
Right - to align the header right.
Justify - to justify the header.
Data Size - define a column data size.
Data Bold - select this check box for a column to put the column data in bold.
Data Underline - select this check box for a column to underline the column data.
Data Alignment - select the alignment for the column data:
Left - to align the data left.
Center - to align the data center.
Right - to align the data right.
Justify - to justify the data.
Data Format - select the column data format:
String - for data in text format.
Integer - for data in integer format.
Decimal - for data in decimal format.
Alias Name - this field is predefined according to the value in the Data Source field:
If DS1 is used as the Data Source, the alias name will contain the DS1 value as the first part of the alias name. For example, [DS1.Alias.table_name.field_name].
If the Parent table identifier alias is used as the Data Source, the alias name will contain the parent table identifier alias name. Enter the field name from the parent table for the corresponding column. As a result, the alias name will have the following structure: [Alias.table_name.field_name].
To preview data and check the entered aliases to the report template, click the Preview and inline data link at the bottom left corner of the page.
To add a new table row with the data to be displayed in the generated report preview in the separate tab, click the Add Row button at the bottom left corner of the page.
To check how the report of the Reports type will look like, use the Report Preview option. For this, click the Generate Preview button in the bottom right corner of the page. This will generate the Report in the PDF format.
Reports Template Usage Example
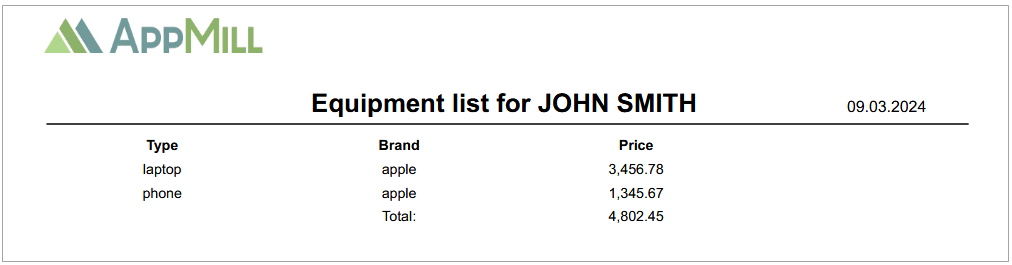
For example, the users need to generate report containing details about equipment assigned to the corresponding user. The report template will include the details about the equipment assigned to the user displayed in the table view.
The report template of the Reports type with 3 columns and 1 total is selected as a report template for report generation in the Render application.
To create the report with the report template of the Reports type with 3 columns and 1 total, fill in the following parameters:
Report Title - add the title that contains the aliases to connect the report template to the database table.
Column Details - define the column parameters as follows:
1st column - is used for the equipment type and named Type with the corresponding alias in the Alias Name field.
2nd column - is used for the equipment brand and named Brand with the corresponding alias in the Alias Name field.
3rd column - is used for the equipment price and named Price with the corresponding alias in the Alias Name field.
After creating the report template, set up and add the button of the Generate report type to the screen in the Architect application. In the Render application, clicking the button of the Generate report type will generate a report. For more details about button configuration, refer to the Button Configuration page.
In the Render application, the generated report of the Reports type can be displayed as follows:
PDF Form Template Type
The report template with PDF Form type can be created using any online or desktop PDF editor.
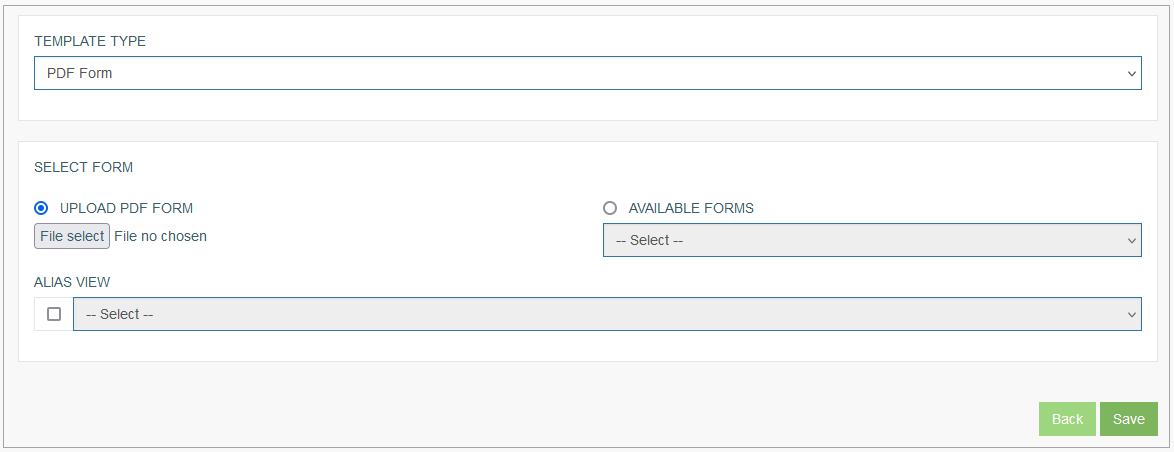
If the PDF Form is selected as a report template type, the Select Form section appears. Here, users can upload a new or select the available PDF report templates by marking one of the parameters below:
Upload PDF Form - activate this parameter to upload a new report template in the PDF format.
File select - click the button to select and upload the report template in PDF format from the local device.
or
Available Form - activate this parameter to select the previously uploaded PDF report template from the drop-down list. All templates from the drop-down list that are uploaded by users and placed in the AppMill\Service\ReportTemplate\PDFFormTemplateFolder folder.
Alias View - select the Alias View from the drop-down list to connect the Alias View to the report template. The generated report will be filled in with required data from the corresponding Alias View.
PDF Form Template Usage Example
In the example described below, the report of PDF Form type is created using the report template configured via the online PDF editor.
Note that the desktop PDF editor can also be used for creating the report template.
To create the report template using the online PDF editor, open any online PDF editor in the internet browser and upload the file in the PDF format. For example, we upload the W-9 form of the Request for Taxpayer Identification Number and Certification. This document may contain the user's personal information, such as their first and last names, email address, phone number, and so on. All information concerning the user can be added to the report template using aliases.
Add the alias names using the Textbox or field to the corresponding part of the report template. The alias names should be in the square brackets. Otherwise, the alias will not apply the correct data and will be displayed as regular text.
In this example, to display the user’s first and second names, we add the aliases containing the user’s first and second names to the area where the user’s first and second names should be placed.
Also, the marked check boxes can be set to be displayed in the generated reports. For that, the alias should contain the checkbox value.
The created report template can be added to the Report on the Report Builder page.
To create the report of the PDF Form, fill in the following parameters on the Report Builder page.
Template Type - select the PDF Form template type from the drop-down list. In the appeared Select Form section fill in the following parameters:
Upload PDF Form - select this parameter to activate the Upload PDF Form function.
File select - click this button to upload the report template in PDF format.
Save the report of PDF Form type by clicking the Save button.
To enable the possibility to generate reports on screens in the Render application, set up and add the button of the Generate report type to the screen in the Architect application. In the Render application, clicking the button of the Generate report type will generate a report. For more details about button configuration, refer to the Button Configuration page.
In the Render application, the generated report of the PDF Form type can be displayed as follows:
Please note that if users view generated PDF form reports using the Adobe Acrobat extension for Chrome, form field values might not display correctly. This issue does not occur with the desktop version of Adobe Acrobat or Chrome's default PDF viewer.
For optimal display of form field values in generated reports, it is recommended to use either Adobe Acrobat’s desktop version or Chrome's built-in PDF viewer.
Update Report
To edit a Report, click the Edit (pencil) icon for the selected Report Template in the search results table. The Update Report page opens for editing.
After making the necessary changes, click the Submit button. To return to the Overview page, click the Back link.
Delete Report
To delete a Report, click the Delete icon on the Overview page for the selected Report entry. The confirmation pop-up will appear where you can confirm or cancel the action.