Access
Click System data > Extension Functions to add the extension functions or plugins stored in Service to the Architect.
Table of Contents
Overview
The Extension Functions functionality provides the possibility to add extension functions (plugins) that can be created in different languages and stored in the Service. The extension functions (plugins) can be further used in the screen configuration process. The function (plugin) can be written in the following languages:
C#
C++
COBOL
JavaScript
PHP
Python
Search
You can search for a extension function and to filter the search results. For this, use the search filter and click the Enter key or on any screen place. The screen displays search results if found. To have an overview of all access rules, leave the filter empty and click the Enter key or on any screen place.
Sort Search Results
You can sort search results by the columns in ascending (arranged from the smallest to the largest number and alphabetically for letters) or descending (arranged from the largest to the smallest number and in reverse alphabetical order for letters) order. Columns' names, by which search results can be sorted, are indicated with arrows. Click the appropriate column name to sort search results by it.
Navigate
Use the navigation bar at the bottom of the Overview page to navigate through the pages. Click the appropriate page number to open it. Use the Arrow icons to go to the next page or the previous page of the Search Results list accordingly.
Create Extension Function
Click the Create button on the Overview page to create a new extension function. This opens the page in creation mode.
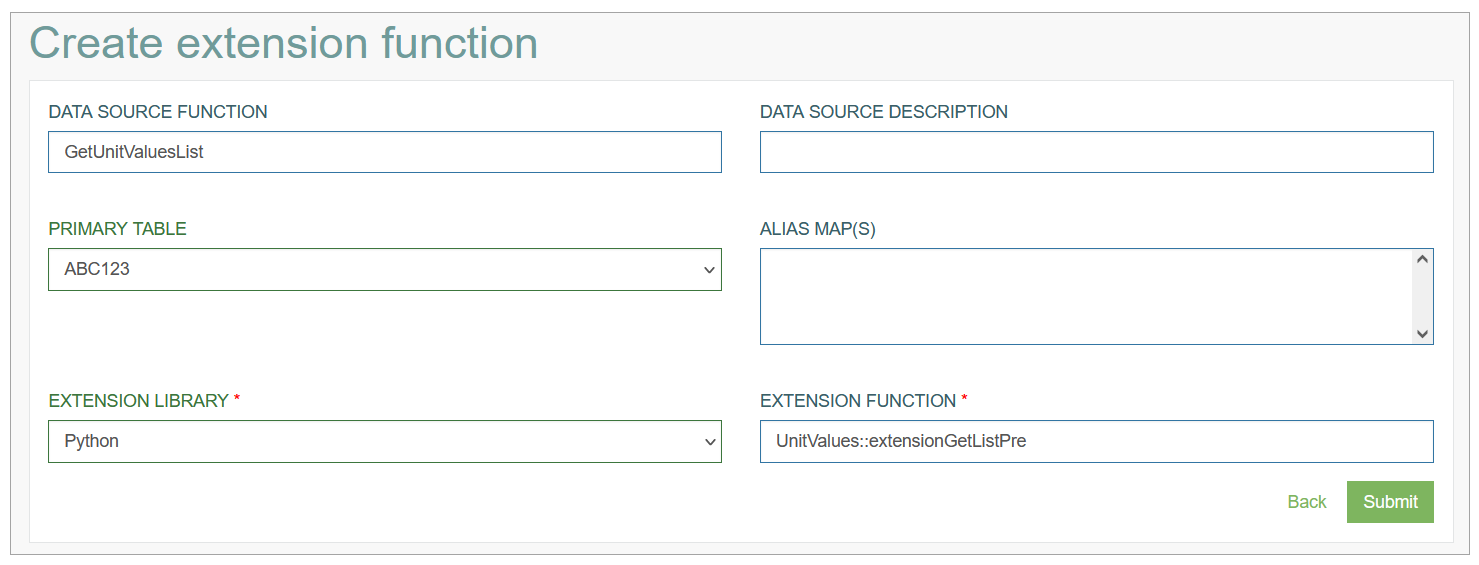
Fill in the following fields:
Data Source Function – enter a name for a new extension function.
Data Source Description - add a short description for the extension function. This is a required field.
Primary Table - select table that the extension function (plugin) will be added to. The selected Primary table will be taken into account in the extension functions list on the first page of the Screen Builder.
Alias Map(s) - define the Alias View data that the extension function will receive in JSON parameter.
Extension Library - select the language, in which the extension function is written. E.g., if the plugin is written in C++, select C++ correspondingly.
Extension Function - enter a class name and function name of the extension function. For different languages, the way to connect functions may differ. For example, they can be separated by double semicolon as follows, e.g. UnitValues::extensionGetListPre.
More instructions on how to write and connect extension functions (functions) can be found in the Extension Functions (Plugins) and Alias Framework Extension Functions document.
When writing extension functions (plugins), you need to keep in mind that the plugin's response must match what the UI expects. So, the example of the plugin's response find below:
{
"resultbody": {
"extendedinfo": "<info_text>",
"requestresult": "successfully"
}
}
Pay attention to the request result value. The expected values for this field are "successfully" or "unsuccessfully".
After data is entered, click the Submit button to save the entered data. Click the Back button to go back to the Overview page without saving the data.
Now, the created extension Function can be used in the Screen Configuration. See details in the Configure Extension Functions section on the Screen Master Data Settings page of the User Manual. The included extension function (plugin) added in Screen Configuration will be applied on the screen in the Render application when user clicks the Execute button there.
Update Extension Function
To edit an extension function, click the Edit (pencil) icon for the selected entry on the Overview page. The Update extension function opens for editing.
Make the necessary changes and click the Submit button to save them. To return to the Overview page, click the Back link.
Delete Extension Function
To delete an extension function from the list of added functions, click the Delete icon on the Overview page for the selected entry. The confirmation pop-up will appear where you can confirm or cancel the Delete action.