Access
Click Screen Configurations > Group screen to access the Group Screen functionality and to manage screens united in groups.
Table of Contents
Overview
The Group Screen functionality allows users to build and manage the structure of the Main menu displayed in the Render application. Here you can create and manage the second level menu items (child items) that are assigned to the first level Menu items (parent items) in the Main menu on the Render page.
The screens assigned to a particular menu build a group of screens and are shown in the Menu drop-down list in the Render main menu.
Here you can control the visibility of buttons and the ability to perform particular actions on the screen as well.
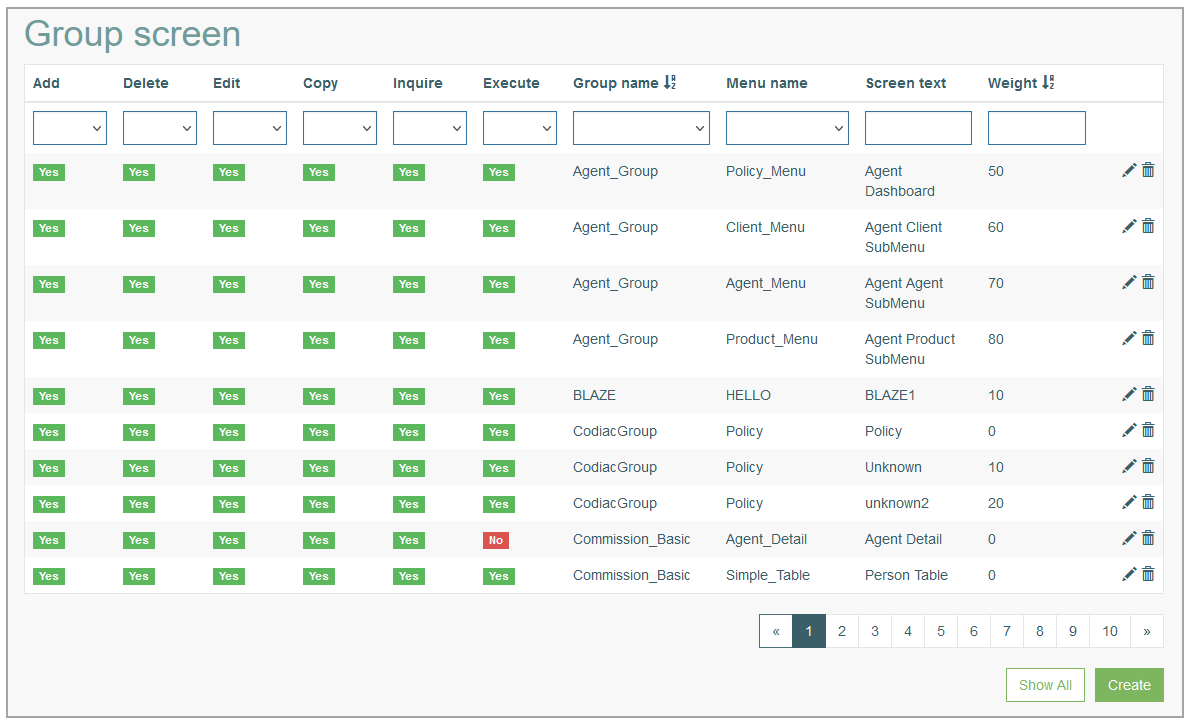
Search
To search for a menu or filter the search results, use the following search filters and enter any or all the search criteria:
Actions - select a Yes or No option for the actions defined for the Group Screen. The following actions can be selected:
Add
Delete
Edit
Copy
Inquire
Execute
Group name
Menu name
Screen text
Weight
After filling in the filters, click the Enter key or any screen place. The screen displays search results if found. Please note, that letters or part of the word entered in the search filter fields will be taken into account while searching as well.
Sort Results
You can sort search results by the columns in ascending (arranged from the smallest to the largest number and alphabetically for letters) or descending (arranged from the largest to the smallest number and in reverse alphabetical order for letters) order. Columns' names, by which search results can be sorted, are indicated with arrows. Click the appropriate column name to sort search results by it.
Navigate
Use the navigation bar at the bottom of the Search Result page to navigate through the pages. Click the appropriate page number to open it. Use the Arrow icons to go to the next page or the previous page of the search results list accordingly.
Click the Show All button to display all the results on one page.
Create Group Screen
Click the Create button on the Search Result page to create a new Group Screen. This opens the Create Group Screen page.
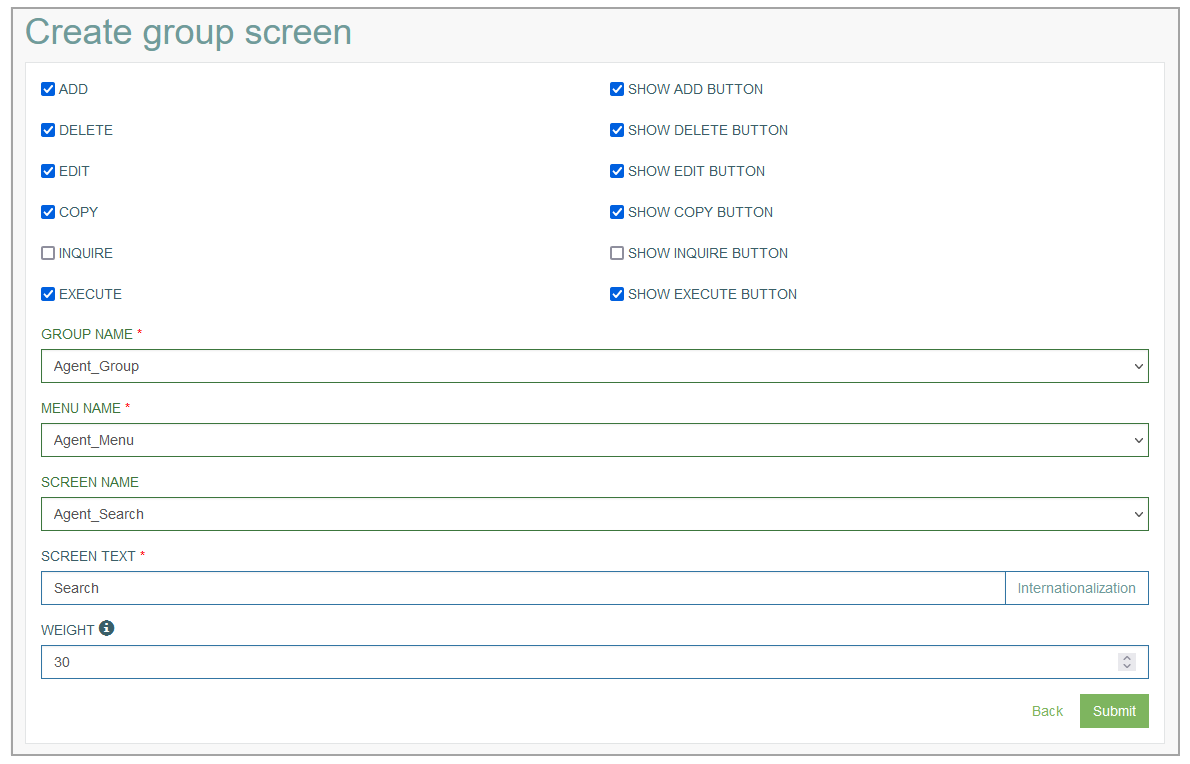
The page is divided in two sections where you can define:
The actions that will be available on the screen and control the visibility of the corresponding buttons.
The parameters of group screen.
Let’s review the settings in details:
Available Actions
Please select the corresponding check boxes to define the actions that will be available on the screen in the Render. Currently the following actions are supported:Add
Delete
Edit
Copy
Inquire
Execute
Visibility of the action buttons in the Render
Please select the corresponding check boxes to define whether the action buttons will be displayed in the Render menu or not. Currently the following actions are supported:Show Add Button
Show Delete Button
Show Edit Button
Show Copy Button
Show Inquire Button
Show Execute Button
There are situations when a user simultaneously belongs to several user groups. Every user group has its own permissions set for actions and button visibility. In this case all permissions from all user groups that the user belongs to will be merged. I.e., the user will get all actions and button visibility permissions from all user groups.
Group Screen Parameters
Please fill in the necessary fields:Group Name – select a User Group Name, for which the screen will be available, from the drop-down list. This field is required.
Menu Name - select a Menu name, an identifier generated automatically at menu creation time.
Note that if the menu items for different user groups have the same value in the Menu Name field, users will only see one menu item in the Menu Name drop-down list, regardless of the selected user group.Screen Name - select a screen from the drop-down list that should be assigned to the menu selected in the previous fields.
Note that the same values for the Menu Name and Screen Name fields can be selected for different user groups. I.e., users that are assigned to the above mentioned user groups will only see one menu item and/or one screen item in the Render application.Screen Text - enter a text for the screen (menu item of the second level) that will be displayed on the Render page.
Internationalization - add the translations into other languages for the displayed Screen Text. For that follow the steps:
click the Internationalization button next to the input field.
In the opened Internationalization pop-up window, select the Language and click the Add button.
A new field for entering the translation value will appear. Enter the text into the input field and click the Apply button.
Weight - define the weight for the screen. For this, enter the number, a so-called global key, which controls the place and the order in which the menu items are displayed in the Render application. The larger the number is, the lower the menu item displayed. This field is required.
In case the Menu items have the same weight, they will be ordered alphabetically.
If you define the weight to be equal to 99, the screen will be hidden in the menu.
After filling in all mandatory and optional fields and selecting the check boxes for the buttons, click the Submit button to save the created Group Screen.
Click the Back button to go back to the Group Screen overview page without saving the data.
Update Group Screen
To edit a Group Screen, click the Edit (pencil) icon for the selected entry in the search results table. The Update Group Screen page opens for editing.
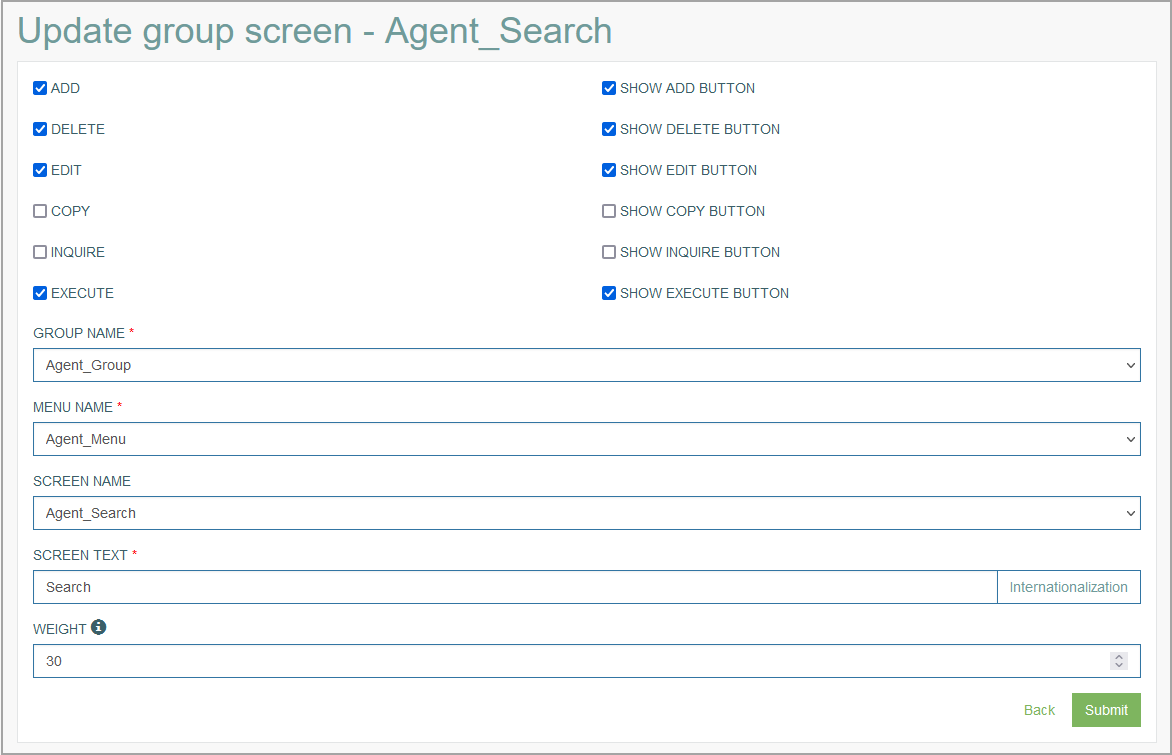
After making the necessary changes, click the Submit button. To return to the Group Screen search page, click the Back link.
Delete Group Screen
To delete a Group Screen, click the Delete icon on the Search Result page for the selected Group Screen entry. The confirmation pop-up will appear where you can confirm or cancel the Delete action.