Access
Click System Data > Alias View to manage custom aliases for single database fields.
Table of Contents
Overview
The Alias View functionality provides the possibility to use Alias Framework in a easier way, to create a pre-defined Alias Framework requests and use them in other functionalities at any time later when it is required.
In contrast to the usual approach of creating the Aliases, when you need to write an Alias Framework query in order to receive the needed data, in case of the Alias View functionality you can pre-define all required data and then use and run it at any time later when you need that data.
The Alias View can be used in the following cases:
The Alias View can be used in the Extension Function when configuring the screen. You can attach any Alias View to the extension function and then later, when the Pre or Post function is executed, the attached Alias View will also be evaluated and the evaluated data will be sent together with other data from the screen.
The Alias View can also be used in the Reports functionality. In this case instead of defining the aliases and inputs for the reports, user can create a particular Alias View and connect it to the report. When the Alias View is evaluated, the report will be filled in by required data.
The Alias View can also be used to validate the alias dependencies and ensure they are set up correctly and the valid data will be received and evaluated.
The Alias View Overview page looks as follows:
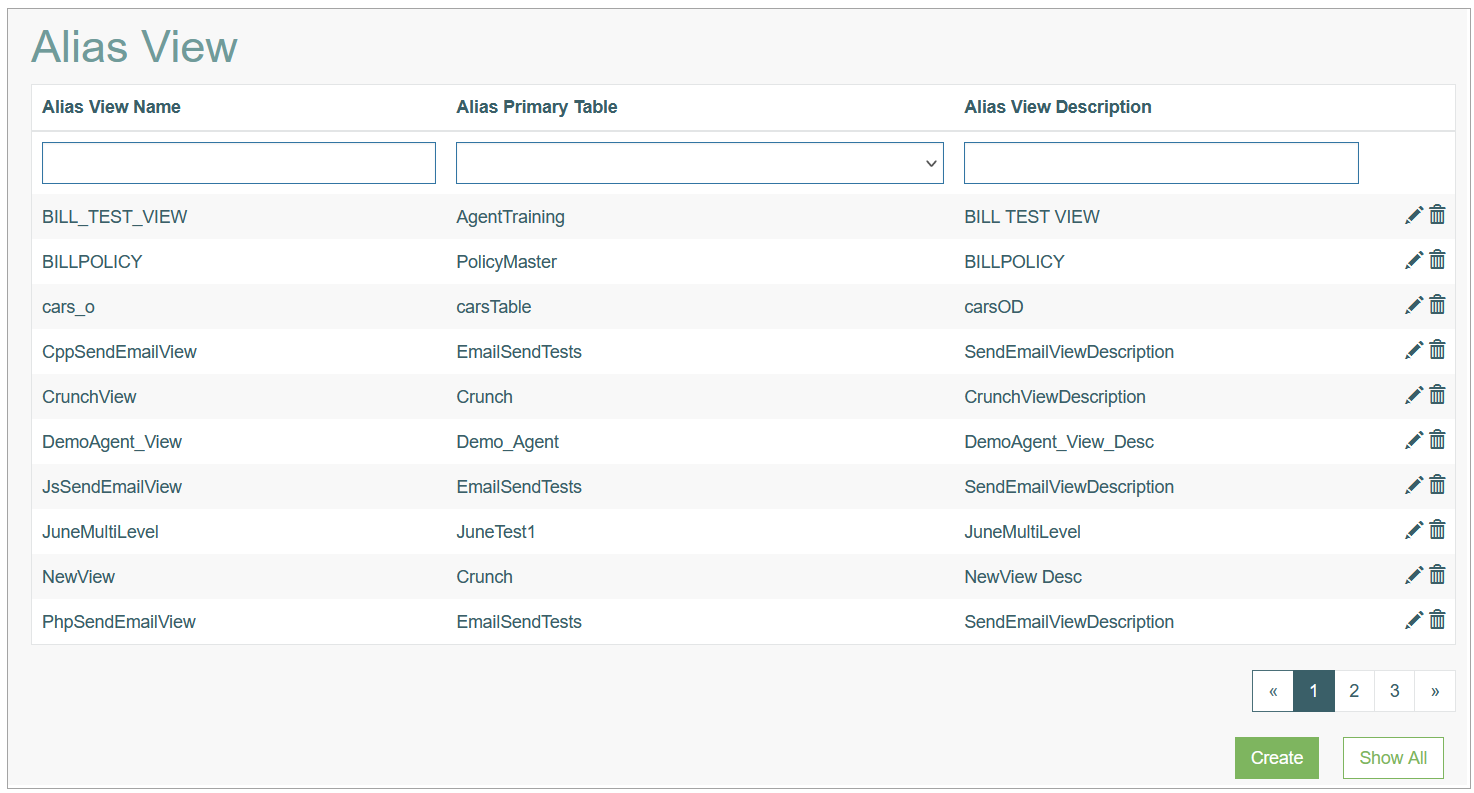
Search
You can search for a particular Database Field Alias or filter search results. For this, use any of the search filters such as Alias Code, Description, Info, Format type, Database Table, Database Field and click the Enter key or on any screen place. The screen displays search results if found. To have an overview of all Database Field alias existing the system, leave the filters empty.
Sort Search Results
You can sort search results by the columns in ascending (arranged from the smallest to the largest number and alphabetically for letters) or descending (arranged from the largest to the smallest number and in reverse alphabetical order for letters) order. Columns' names, by which search results can be sorted, are indicated with arrows. Click the appropriate column name to sort search results by it.
Navigate
Use the navigation bar at the bottom of the Overview page to navigate through the pages. Click the appropriate page number to open it. Use the Arrow icons to go to the next page or the previous page of the search results list accordingly.
Create Alias View
Click the Create button on the Overview page to create a new Alias View. This opens the page in creation mode.
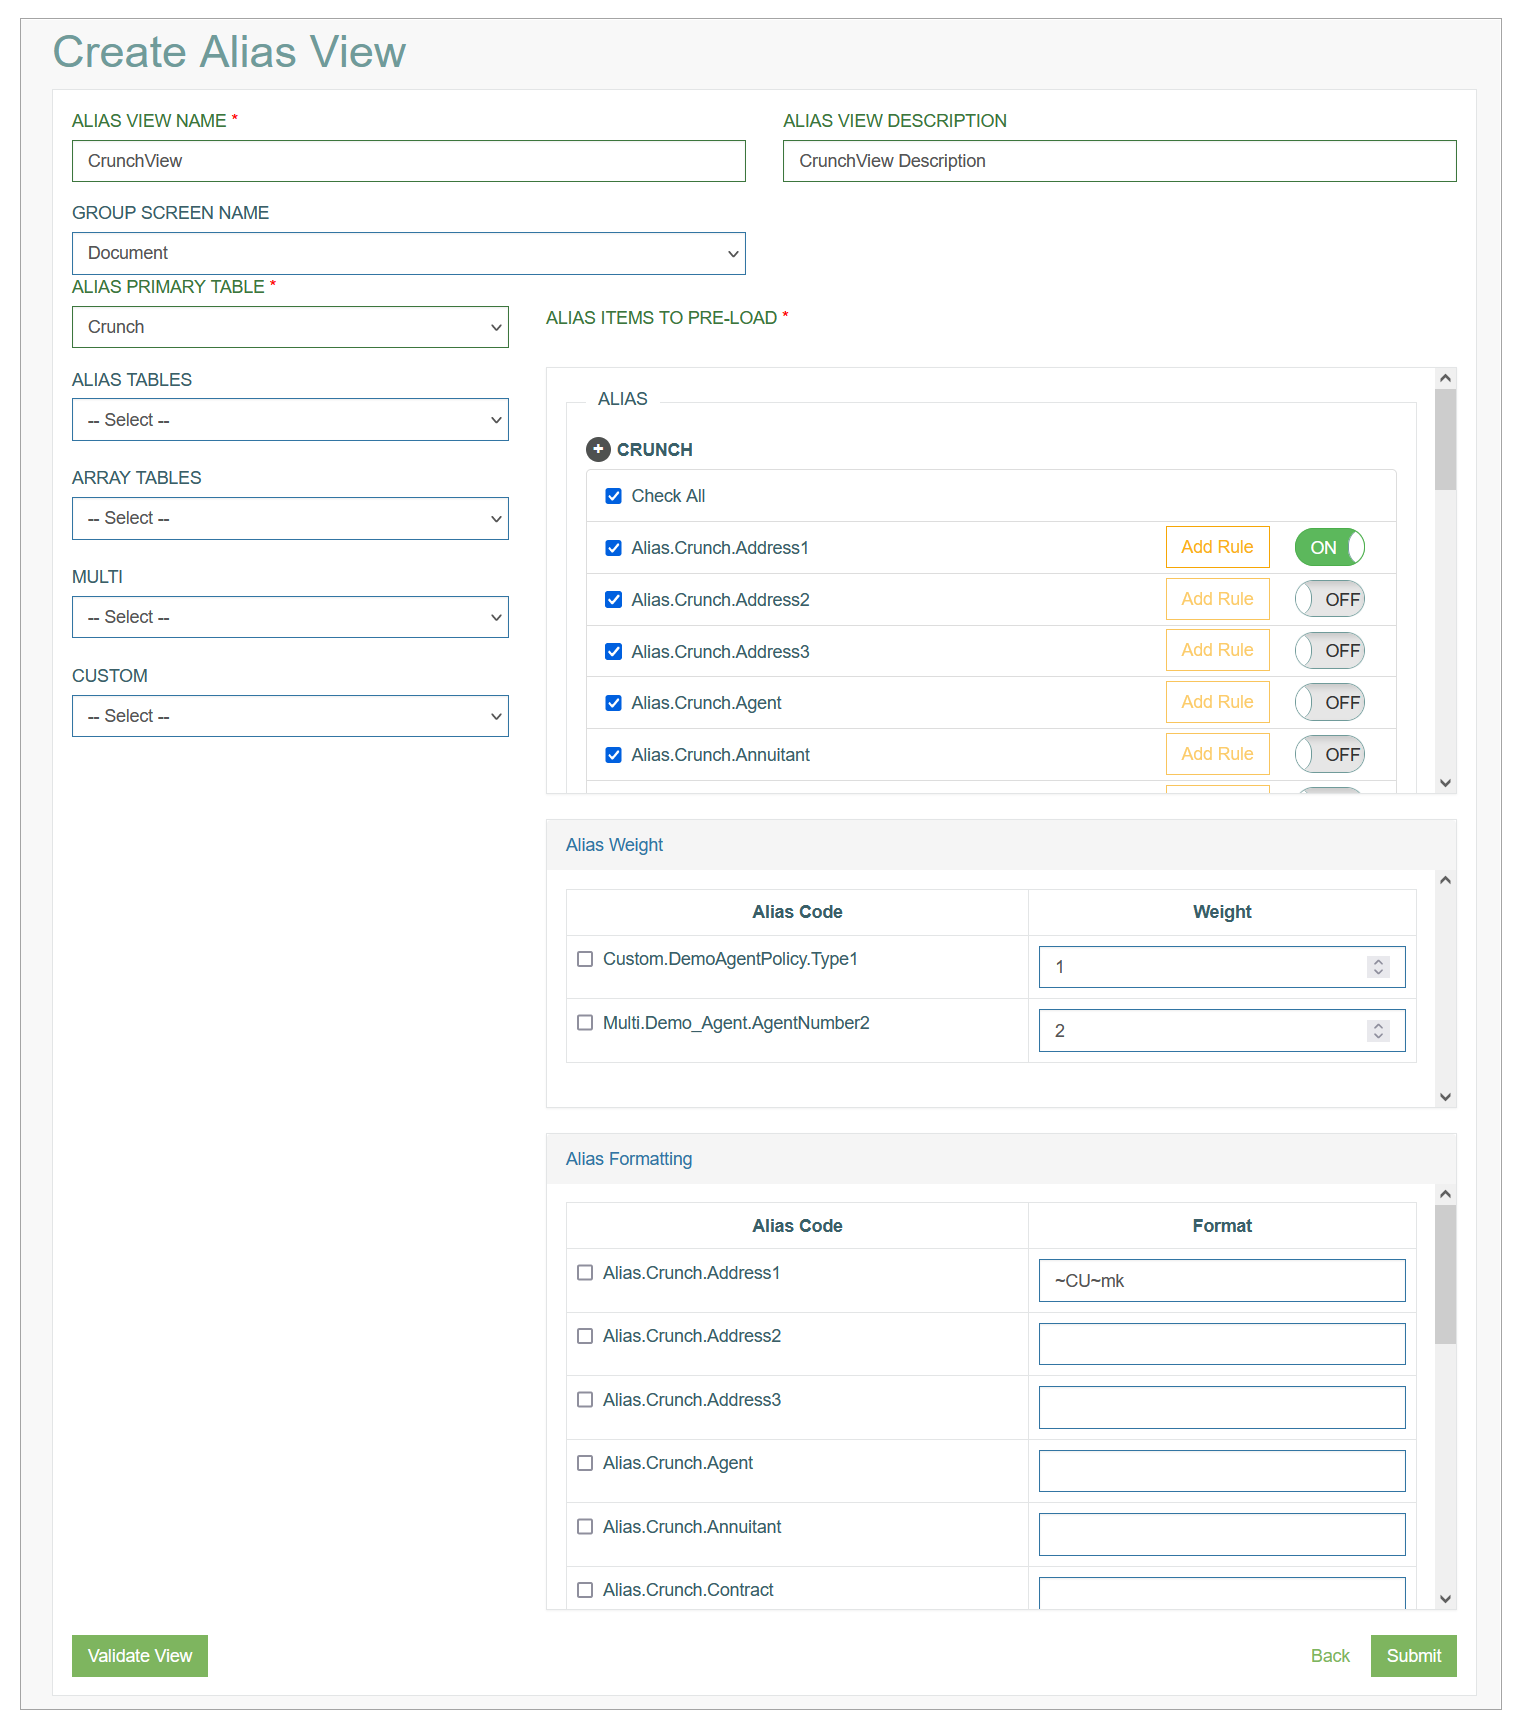
Fill in the following fields:
Alias View Name - enter a name for the alias view. This field is required.
Alias View Description - enter a description for the alias view you are creating.
Group Screen Name - select the Group Screen where the alias view will be used. When you select the particular Screen Group, other Group Screens will be excluded for this alias view. If you leave the field empty, the alias view will work for all group screens.
DEF - means that alias view will be used for all screen groups.
Alias Primary Table - select the database table that is used to evaluate the data.
Other Tables - you can add aliases, arrays, multi and custom tables that will be loaded for the alias view by selecting the tables from the corresponding drop-down lists:
Alias Tables
Array Tables
Multi
Custom
Alias Items to Pre-load
In the Alias Items to Pre-load section, you will see all the aliases that will be sent to the Alias Framework in order to be evaluated.
The section consists of the selected tables' aliases, depending on the alias type:
Alias
Array
Multi
Custom
Click the Plus icon to open the list of aliases for the selected table. In the opened list, you can select all or several aliases by clicking the check boxes. The selected aliases will be evaluated in scope of the created alias view at any time later.
To delete the table, click the Delete icon next to the table name in the Alias Items to Pre-load section.
Add Rule
You can add a rule to any selected alias. The configured rule will be applied to the alias during the validation. The rule can be applied to the alias and arrays tables only (not custom or multi).
To add a rule to the selected alias, first activate the rule by turning the toggle-switch on and click the Add Rule button. The pop-up window appears:
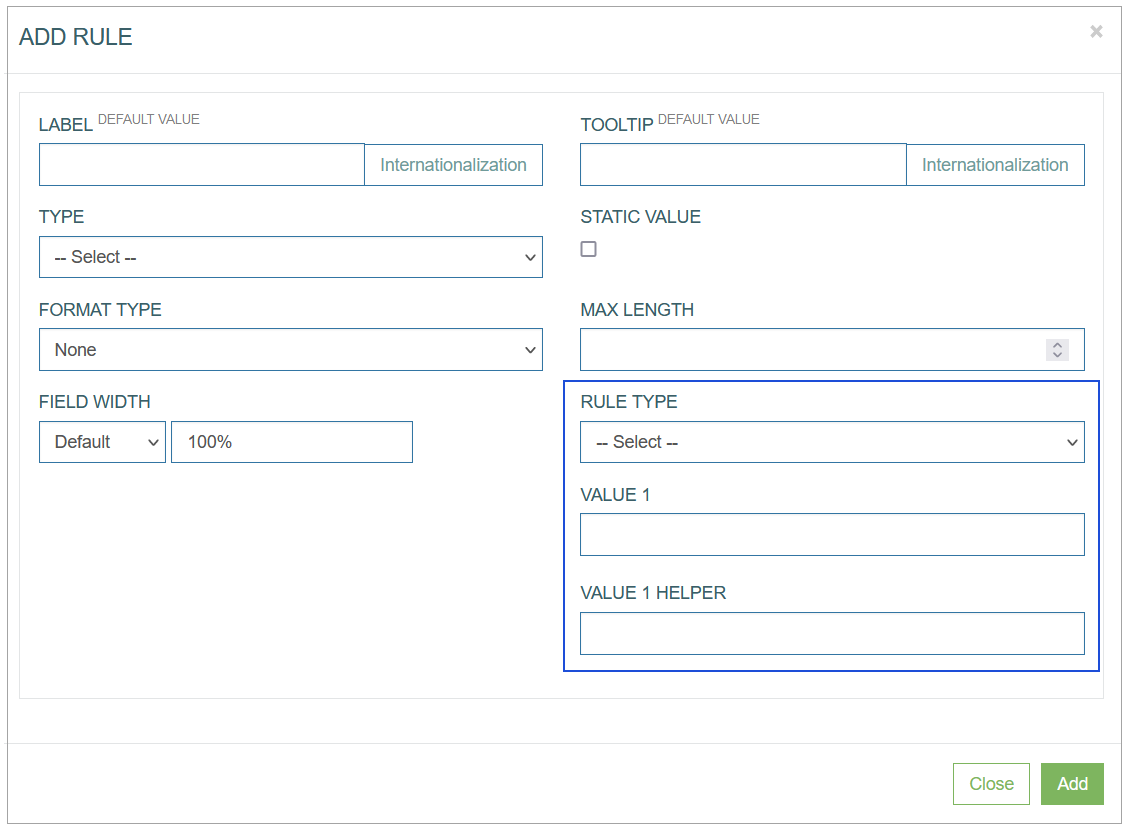
In the pop-up window, you need to set up only the following fields:
Rule Type - select the type of rule that should be applied to the alias value:
Equal - the result of evaluation will return aliases with values equal to the value defined in the rule.
Greater - the result of evaluation will return aliases with values greater than the value defined in the rule.
Greater or equal - the result of evaluation will return aliases with values equal to or greater than the value defined in the rule.
Less - the result of evaluation will return aliases with values less than the value defined in the rule.
Less or equal - the result of evaluation will return aliases with values less or equal to the value defined in the rule.
Like - the result of evaluation will return aliases with values containing the value defined in the rule.
Range - the result of evaluation will return aliases within the specific range defined in the rule.
In - the result of evaluation will return aliases with values equal to the value defined in the rule.
Value 1 - enter the value that will be taken into account when applying the rule during the alias validation. For the Range, users will need to specify the Value 1 and Value 2 fields.
For the In rule type, users can specify multiple values. The values must be delimited with a comma ”,”.Value Helper - enter a help text that will be displayed in the placeholder for the View Parameter field in the View Validation pop-up.
Alias Weight
The Multi and Custom aliases are connected to the Alias Weight. Via the Alias Weight option user can define in which order each custom and multi alias should be evaluated. When you select two and more aliases, they will be displayed in the Alias Weight table where you ca define the weight for each of aliases.
Alias Formatting
The Alias Formatting option provides the possibility to define the format of the alias value, in which the value will be returned from the service and displayed. This is done by appending the name of the formatting function and options to the alias code.
Alias Formatting is relevant for all aliases (alias, array, custom and multi). You can provide the specific string that will define how the alias should be formatted.
Take a look at the example: Array.test.completedby~CQ~QueryName, where
Array.test.completedby - alias code,
~ - separator,
CQ - formatting function,
QueryName - formatting option.
Different formatting functions are currently available (date format conversions, currency formatting, custom query formatting) and all of them have different formatting options.
At the moment, we support the following functions:
CQ (example: "~CQ~acctcodeTOclientname)
description: uses a custom query to format the value
parameter: name of a custom query defined in AppMillTD (example: "~TD~%Y%m%d TO %B %e, %Y")
description: to date, converts from one date format to another using C++ specifiers
parameter: from date and to date separated with " TO " (example: "%Y%m%d TO %B %e, %Y")CU (example: "~CU~mk")
description: converts a numeric value to a specific currency
parameter: the country code of the currencyDE (example: "~DE~2")
description: rounds the number to a specific decimal point
parameter: the number of decimal points
In case a report is set up to use an Alias View with Alias Formatting, users must specify which version of the alias value should be used in the report. If the formatted version of the alias value should be used, users must specify the alias code plus the formatting string in the report, for example, “Array.test.completedby~CQ~QueryName”. Otherwise, they can specify just the alias code “Array.test.completedby”.
Custom Query for Alias Formatting
The custom query (CQ) that is going to be used for alias formatting should be prepared in a specific way.
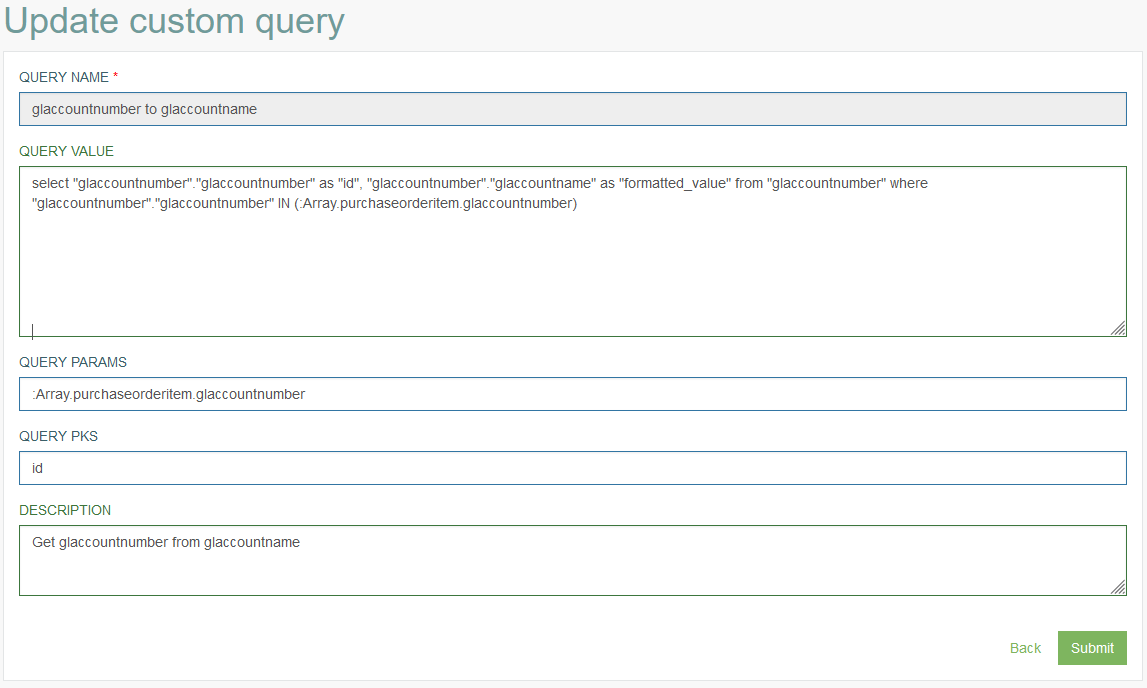
The example of how the custom query can be prepared is described below:
The custom queries should contain the id and formatted_value values in the SELECT part of the query entered into the Query Value field.
id - the same column name where the input values are used.
For the alias with the Alias or Custom types (single values), the id value can be omitted.formatted_value - the value that will be shown for the formatted alias.
For example, the following value could be entered into the Query Value field:
SELECT “glaccountnumber”.“glaccountnumber” as ”id”, “glaccountnumber”.“glaccountname” as ”formatted_value” from “glaccountnumber” where “glaccountnumber”.“glaccountnumber” IN (:Array.purchaseorderitem.glaccountnumber)
The input value should be the alias value(s) that will be formatted, in this case Array.purchaseorderitem.glaccountnumber. This alias also must be the only Query Params value specified for the custom query.
Depending on the alias type (single or multi value), an appropriate operator should be used.
The example of the custom query for the aliases with the Alias or Custom types (single value) is displayed below: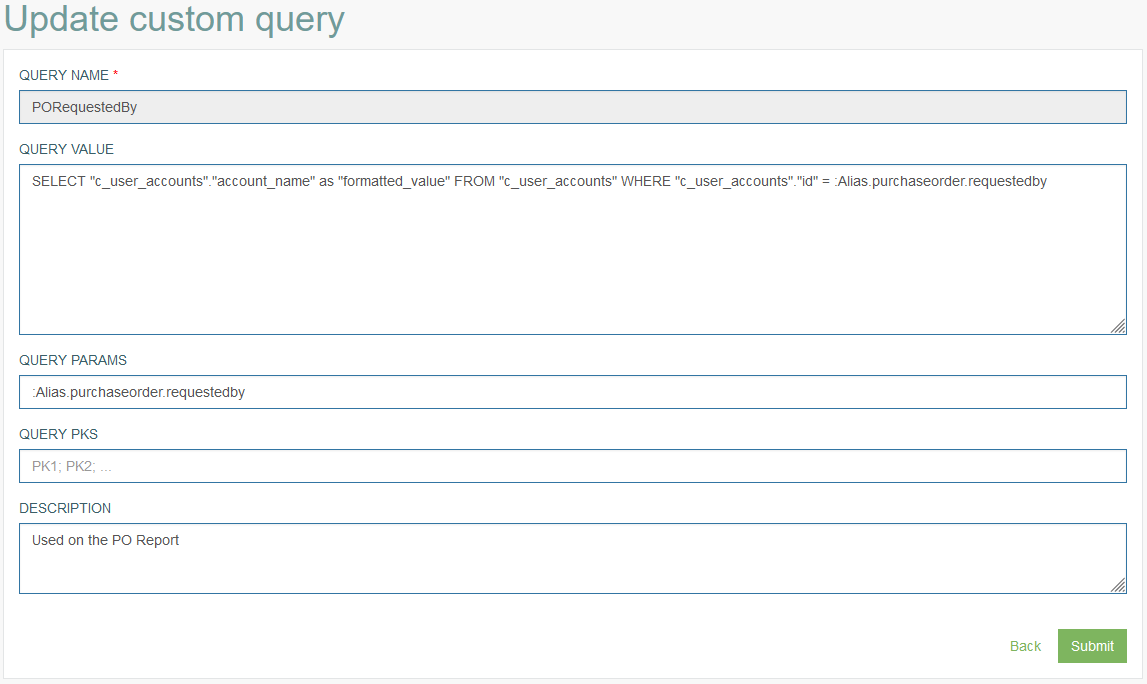
The following operators can be used:
IN - this operator should be used if the aliases with the Array or Multi types are formatted and many input values are provided for formatting.
= - this operator can only be used for formatting the aliases with the Alias or Custom types.
For more details about custom query, refer to the Custom Query page of the User Manual.
Validate Alias View
To avoid errors while configuring the Alias View, you can validate view and check whether the Alias View is set up correctly and all aliases have the dependencies that are suppose to have.
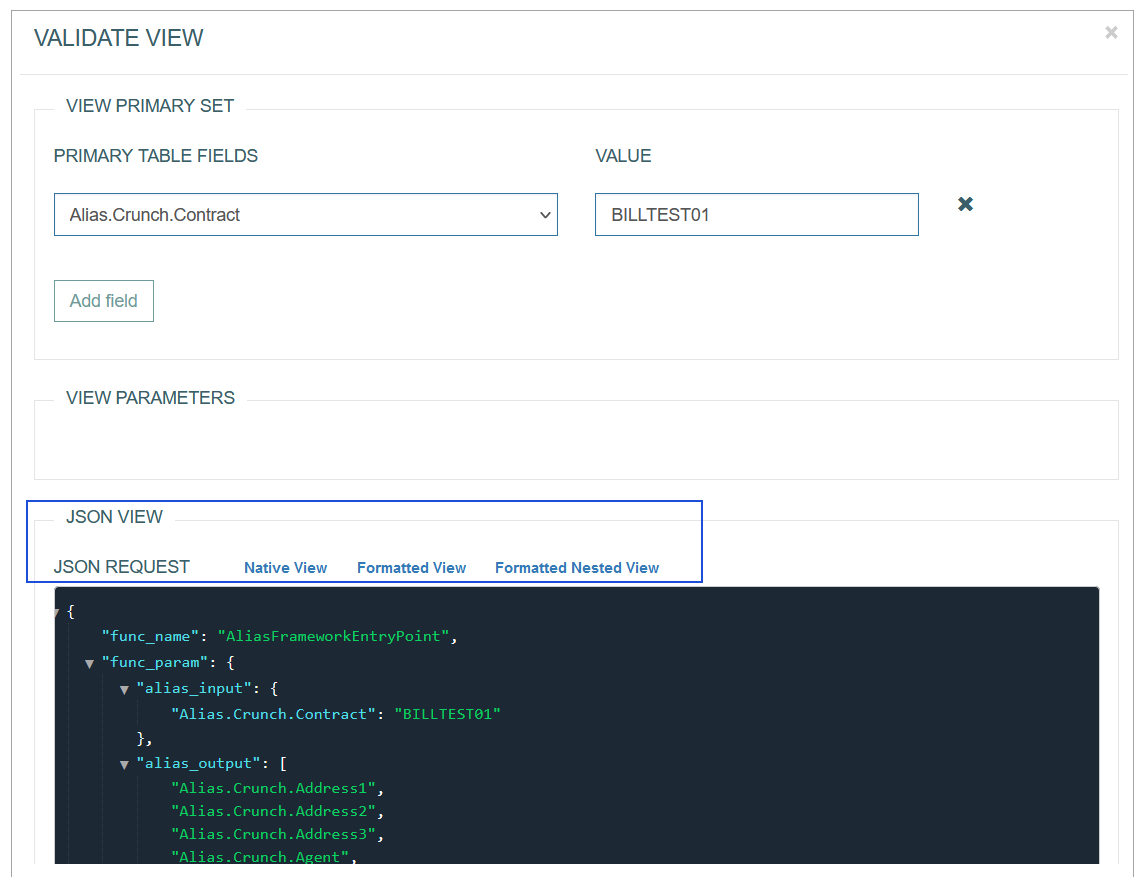
Click the Validate View button, the Validate View pop-up window will be opened:
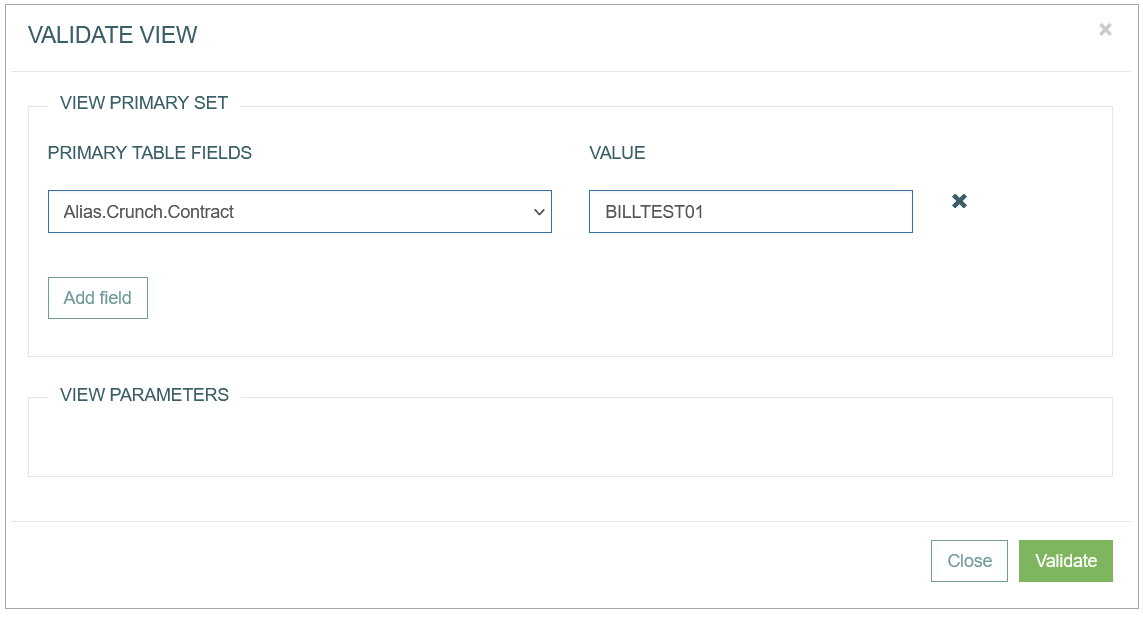
Select the Primary Table Fields (Primary key), enter the field Value.
To apply the specific rules, enter the Rule Value into the View Parameters field.
Click the Validate button to start the alias view evaluation. In the JSON View section, you will see the result of the validation. Explore the different representations of JSON request:
Native View
Formatted View
Formatted Nested View
Delete Alias View
To delete a Alias View, click the Delete icon on the Overview page for the selected entry. The confirmation pop-up will appear where you can confirm or cancel the Delete action.