Access
Click System Data > TPC Custom Endpoints to access the functionality for creating and managing TPC Custom Endpoints.
Table of Contents
Overview
The TPC Custom Endpoints functionality provides the possibility to create API endpoints that execute extension functions, manage secure authentication, enforce IP-based access control, and pass additional data through headers and encrypted values.
Search
To search for a menu or filter the search results, use the following search filters and enter any or all the search criteria:
Endpoint Name
Extension Function ID
Pass Thru Guest User
After filling in the filters, click the Enter key or any screen place. The screen displays search results if found. Please note, that letters or part of the word entered in the search filter fields will be taken into account while searching as well.
Sort Results
You can sort search results by the columns in ascending (arranged from the smallest to the largest number and alphabetically for letters) or descending (arranged from the largest to the smallest number and in reverse alphabetical order for letters) order. Columns' names, by which search results can be sorted, are indicated with arrows. Click the appropriate column name to sort search results by it.
Navigate
Use the navigation bar at the bottom of the Overview page to navigate through the pages. Click the appropriate page number to open it. Use the Arrow icons to go to the next page of the previous page of the search results list accordingly.
Click the Show All button to display all the results on one page.
Create TPC Custom Endpoint
Click the Create button on the Overview page to create a TPC Custom Endpoint. This opens the Create TPC Custom Endpoint page.
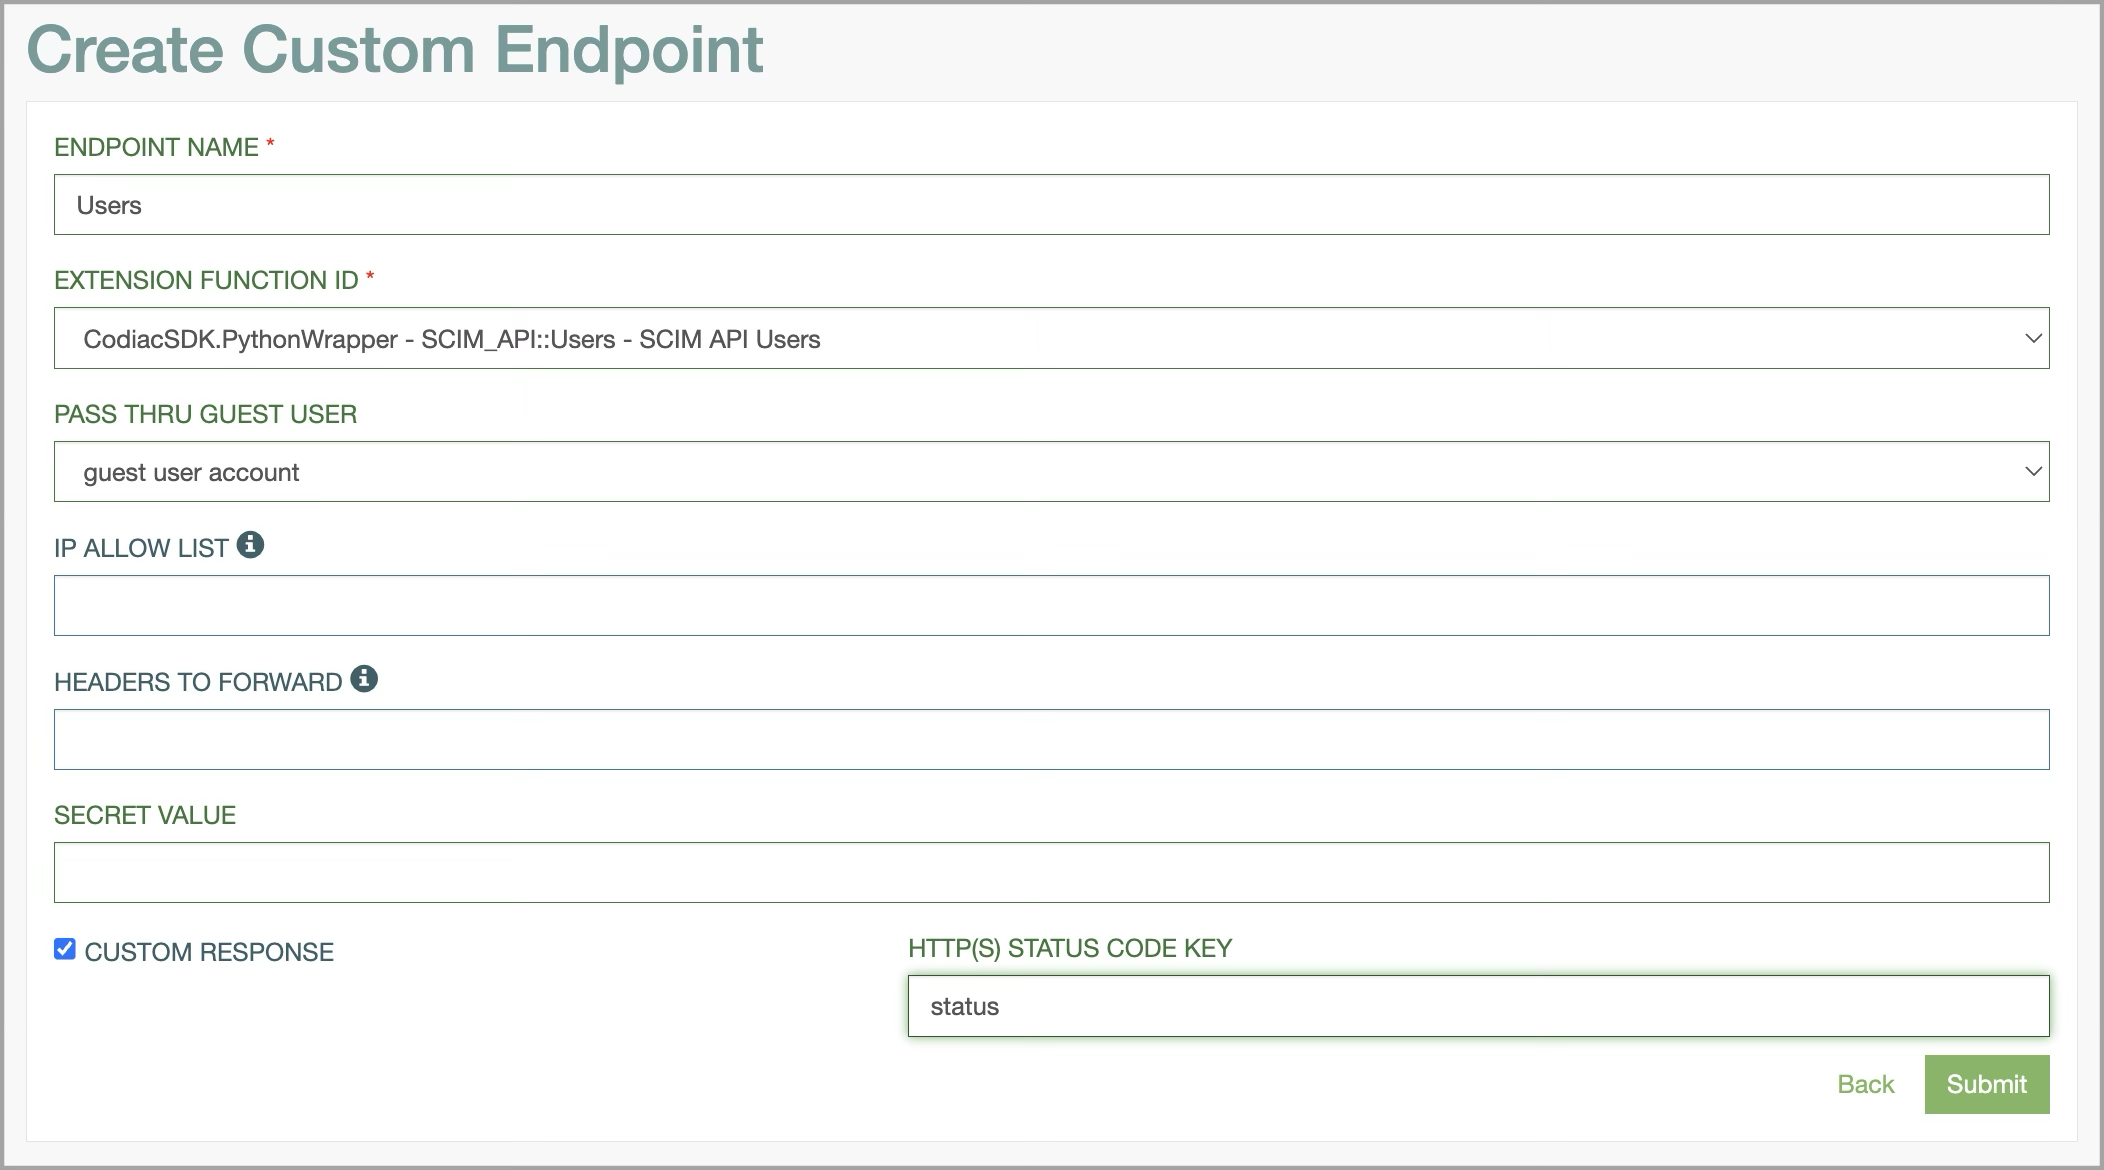
Fill in the following fields:
Endpoint Name – specify a unique name for the endpoint, which will act as its identifier in the system and URL. This is a required field.
Extension Function ID – provide the ID of the extension function that will be executed when the endpoint is accessed. This field is mandatory and cannot be null.
More instructions on how to write and connect extension functions (plugins) can be found in the Extension Functions (Plugins) and Alias Framework Extension Functions document.
Pass-Thru Guest User – define the user that will be used for authentication on the AppMill system. If left null, the client must authenticate by other means, such as calling the TPC login function or specifying the "Authorization" or "Session-Handle" in the HTTP headers.
IP Allow List – input a semicolon-separated list of IP addresses. If specified, only requests originating from these IP addresses will be allowed to access the endpoint, adding a layer of security.
Headers to Forward – provide a semicolon-separated list of HTTP header keys. The values of these headers will be forwarded to the extension function as parameters under the additional_data JSON key. This enables the function to receive additional context or configuration for processing.
Secret Value – enter a secret value associated with the endpoint. This value can be encrypted using the "Column Encryption" feature for security purposes. The decrypted secret value will be passed to the extension function under the additional_data JSON key for validation or processing.
Custom Response – select this option to control the response format. When selected, the response will match the JSON returned by the extension functions (plugins) directly. If unselected, the response will be wrapped inside an AppMill response structure.
HTTP Status Code Key – specify the key name where the HTTP status code will be stored when Custom Response is checked. This field is only active when Custom Response is checked. The value from this key will be used as the response's HTTP status code.
The headers specified in the Headers to Forward and the decrypted Secret Value will be included in the function parameters under the JSON key "additional_data". So inside the function parameters you would have something like this:
{ |
The API endpoint URL format is as follows:
{{protocol}}://{{service_ip}}:{{service_port}}/osoc/api/thirdpartycontroller/{{tpc_endpoint_name}}
After filling in all mandatory and optional fields click the Submit button to save the created TPC Custom Endpoint. Click the Back button to go back to the Overview page without saving the data.
Steps to Configure a Custom Endpoint
This section provides a step-by-step guide for configuring and using a TPC Custom Endpoint. It is useful to set up an API endpoint that executes extension functions while enforcing security and access control. Follow these steps to create, register, and test the endpoint to ensure it functions well.
Write Extension Function
To create an extension function, start by writing the function in a supported programming language such as PHP, JavaScript, Python, or C++. The function must be implemented according to system requirements and should handle the necessary logic for processing incoming requests.
Once the function is written, ensure that the service where it will be hosted has a static IP address. The service must allow public access to the required port. Place the function (plugin files) in the appropriate service directory so it can be properly executed when called by the system.
Register Extension Function
To register an extension function in the AppMill Architect application you need to create an Extension Function. For more information see the Create Extension Function section on the Extension Functions page (System Data > Extension Functions) of the User Manual.
Test the Endpoint (via Postman)
After registering the extension function, testing the TPC custom endpoint ensures it works correctly. Postman or a similar API testing tool can be used to send requests and verify responses.
To test the Endpoint, follow these steps:
Create a TPC custom endpoint. For more information see the Create TPC Custom Endpoint section of the current page.
Use the API URL format: {{protocol}}://{{service_ip}}:{{service_port}}/osoc/api/thirdpartycontroller/{{tpc_endpoint_name}}
Send a request and verify that the response matches the expected output, confirming that the extension function executes as intended.
Update TPC Custom Endpoint
To edit a TPC Custom Endpoint, click the Edit (pencil) icon for the selected entry in the search results table. The Update TPC Custom Endpoint page opens for editing.
After making the necessary changes, click the Submit button. To return to the Overview page, click the Back link.
Delete TPC Custom Endpoint
To delete a TPC Custom Endpoint, click the Delete icon on the Overview page for the selected entry. The confirmation pop-up will appear where you can confirm or cancel the action.