Access
Click System Data > Client Verification to manage the synchronization of plugins and services.
Table of Contents
Overview
The primary purpose of a Client Verification functionality is to control and manage the level of access that client applications have to the entire service. By default, this functionality is deactivated, granting unrestricted service access to all client applications. When activated, unverified client applications will be limited to accessing only the third-party controller.
The Client Verification functionality provides a possibility to manage the data related to the client verification process such as:
setting time interval to validate a request key;
setting time interval when the request key will be changed;
the client verification activation.
For example, this functionality can be used to manage the licenses. There is important to manage the licenses usage time as it is usually granted for a specific duration of time. By implementing robust license usage time management, organizations can optimize resource allocation, prevent unauthorized usage, and stay compliant with licensing agreements. This functionality allows administrators to track the expiration dates of licenses, ensuring that software or services are utilized within the defined timeframe.
Here is a list of applications that support the Client Verification functionality, and the place where the generated request key can be specified:
Architect and Render - the generated request key can be specified in the request_key attribute in the params-local.php file stored in the config folder by the following path: config\params-local.php.
WebDesigner - the generated request key can be specified in the $request_key attribute in the params.php file stored in the config folder by the following path: webdesigner\config\params.php.
ReportDesigner - in the pop-up window that will be opened after clicking the Configuration button on the Login screen.
Enable Client Verification
On the first run the Client Verification functionality should be deactivated in order for the main client application (Architect) to be able to generate the first request key. After that the functionality can be activated and the generated request key can be used to validate the main client application (Architect).
To enable the Client Verification functionality, the following steps should be performed:
In the CodiacSDK.Core.config service configuration file stored in the service_folder folder, set the value of the client_verification parameter to false as described in the example below:
<config>
  <datapool dbtype = "Abcdf" address = "123.4.5.1" port = "1234" name = "abcdf" password
  <logs store = "false" plugins_logs = "false" store_db = "false" />
  <devicecryptor deviceaeskey = "NLkfn82390amKCMDS83kfjlsOIERTH89435KBAsd93XBjbjg4JL23JG785khk93F" />
  <security language = "Language.en-US" encryption = "false" hashpassword="qwer"
  client_verification="false"/>
  <passthru is_passthru = "false" acceptXML="true" />
</config>
Restart the AppMill Service application.
Open the PHP Architect application, and select the following parameters from the menu: System data > Client Verification. Click the Create button.
On the Create page enter the following parameters:
Client Name - a unique name that identifies the generated request key.
RK Validity (hours) - this parameter indicates the duration for which the request key will remain valid after its generation. The request key must be used within this specified timeframe.
VK Update Interval (hours) - to increase security, the request keys should be continuously rotated. And this parameter specifies how often the request keys should be updated.
Active - this parameter specifies whether this Client Verification entry is active or not. If it is unchecked, all client applications previously verified with this request key will be denied complete service access.
Click the Submit button. After that the generated request key will be available and can be used to verify client applications.
In the CodiacSDK.Core.config service configuration file stored in the service_folder folder, set the value of the client_verification parameter to true as described in the example below:
<config>
  <datapool dbtype = "Abcdf" address = "123.4.5.1" port = "1234" name = "abcdf" password
  <logs store = "false" plugins_logs = "false" store_db = "false" />
  <devicecryptor deviceaeskey = "NLkfn82390amKCMDS83kfjlsOIERTH89435KBAsd93XBjbjg4JL23JG785khk93F" />
  <security language = "Language.en-US" encryption = "false" hashpassword="qwer"
  client_verification="true"/>
  <passthru is_passthru = "false" acceptXML="true" />
</config>
Restart the AppMill Service application.
Note that if there are multiple client applications on the same device used by the same user account, generating multiple request keys is unnecessary. Verifying one application is sufficient when they are used by the same user account on the same device.
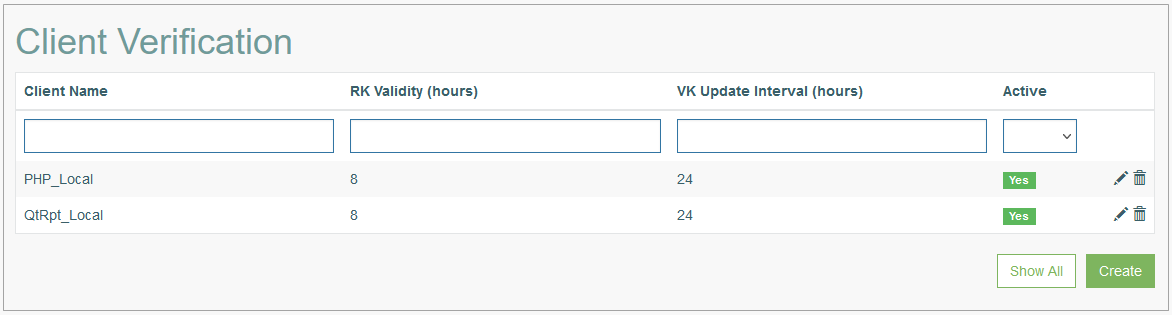
Search
To search for an auto sequence or filter the search results, use the following search filters and enter any or all the search criteria:
Client Name
RK Validity (hours)
VK Update Interval (hours)
Active
After filling in the filters, click the Enter key or any screen place. The screen displays search results if found. Please note, that letters or part of the word entered in the search filter fields will be taken into account while searching as well.
Sort Results
You can sort search results by the columns in ascending (arranged from the smallest to the largest number and alphabetically for letters) or descending (arranged from the largest to the smallest number and in reverse alphabetical order for letters) order. Columns' names, by which search results can be sorted, are indicated with arrows. Click the appropriate column name to sort search results by it.
Navigate
Use the navigation bar at the bottom of the Overview page to navigate through the pages. Click the appropriate page number to open it. Use the Arrow icons to go to the next page of the previous page of the search results list accordingly.
Click the Show All button to display all the results on one page.
Create Client Verification Entry
Click the Create button on the Overview page to create a new Client Verification entry. This opens the Client Verification Entry page.
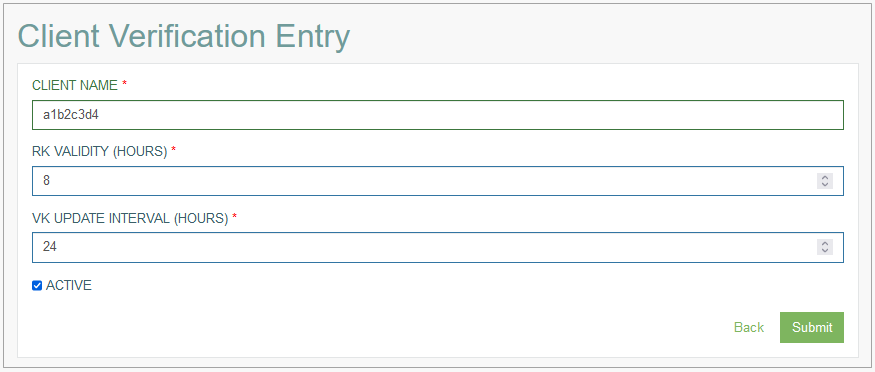
Fill in the following fields:
Client Name - a unique name that identifies the generated request key.
RK Validity (hours) - this parameter indicates the duration for which the request key will remain valid after its generation. The request key must be used within this specified timeframe.
VK Update Interval (hours) - to increase security, the request keys should be continuously rotated. And this parameter specifies how often the request keys should be updated.
Active - this parameter specifies whether this Client Verification entry is active or not. If it is unchecked, all client applications previously verified with this request key will be denied complete service access.
After filling in all mandatory and optional fields, click the Submit button to save a new Client Verification entry.
Click the Back button to go back to the Overview page without saving the data.
Update Client Verification Entry
To edit a Client Verification entry, click the Edit (pencil) icon for the selected Client Verification entry in the search results table. The Client Verification Entry page opens for editing.
After making the necessary changes, click the Submit button. To return to the Overview page, click the Back link.
Delete Client Verification Entry
To delete a Client Verification entry, click the Delete icon on the Overview page for the selected Client Verification entry. The confirmation pop-up will appear where you can confirm or cancel the action.